Arduino C++
Sections marked with 🎓 are advanced knowledge, ignore these for now and unfold them once you’re ready to go deeper!

Arduino C++ Basics (PDF) ← Here’s an even simpler single page introduction for you to 🖨️ print
Prelude - Getting things set up
Programming - The basics
Comments
// This is a comment - it's ignored when the program runs
Basic Structure
The very basic structure of a C++ program in Arduino:
// the setup function runs at the very start of the program
void setup() {
	// in here you can initialize all the things that need initializing
}

// the loop function runs again and again and again for as long as your program runs
void loop() {

}
🎓Lifecycle
What we need to know to be able to program

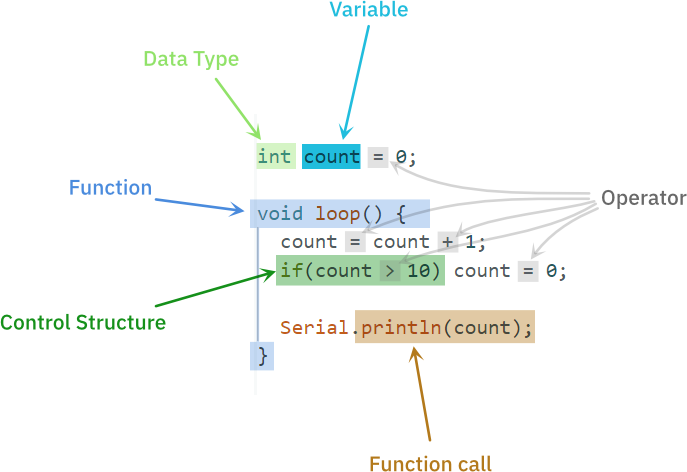
These are the very basic things we have to understand to be able to program:
-
📜 Instructions = individual commands
-
🆎 Data Types = the types of data we can use
-
📦 Variables = containers that hold bits of information that we can change and work with
-
🔣 Operators = how to assign values to variables, etc.
-
🔂 Control structures = how to compare stuff and branch out
-
↗️ Functions = sections of code that can be called from elsewhere in the program

These things all play together, so it might be confusing at first when you learn about one while you don’t yet know about another. But bear with me, it will all make sense after an hour or two!
1. Instructions
An instruction is a single command that ends with a semi-colon ;
-
When programming, we’re writing lists of instructions for the computer to execute.
-
Instructions can be function calls, variable asignments, control instructions, etc.
Here’s an example with 3 instructions inside the setup function:
void setup() {
	int a = 0; // make a variable of type integer, call it "a" and assign 0 to it
	a = a + 5; // add 5 to a
	a = a - 2; // subtract 2 from a
}

Note how every instruction in C++ has to end with a semi-colon ;!
2. Data Types
Data Types define the kind of data that a 📦*variable *can hold.
**bool** - true or false
**int**** - used to store an integer number (like 438 or -12)
**float** - used to store floating point numbers (like 37.83752 or -1.2)
**char** **- used to store a single character (like 'C' or 'f')
String - used to store text (like "Hello" or "Who came up with this nonsense?")
🎓Complete List of Data Types
🤔 Now what do we do with these data types? We make variables!
3. Variables
A variable represents a value that can change.
- Think of it as a box where you can put different things (numbers, words, or other data)
- Pick a data type - what kind of thing do you want to store?
- Give your variable a name
For example: You can make a variable called score that you can put the player’s current score into (like 25, 52 or 100)
int score = 100;
float num = 32.19076;
String name = "Bob";
Basic signature of a variable: data-type variable-name = initial value;
🎓 Scope and Lifetime:
🤔 So what do we do with variables? We assign and re-assign values and we compare them with operators!
4. Operators
Assign a value
**=**(simple assignment).* Example:*score = 12;
Change values
-
**+**(addition).* Example:*score = score + 2;-
**+=**(addition assignment).* Example: **score += 2;* -
**++**(increment by 1).* Example: **score++;*
-
-
**-**(subtraction).* Example:****** *score = score - 10;-
**-=**(subtraction assignment).* Example: *score -= 10; -
--(decrement). Example:score--;
-
-
*(multiplication).* Example: *score = score* 2; -
**/**(division).* Example: *score = score / 4;
Compare values:
-
**==**(equal to).* Example: *if(name == "Bob") { Serial.println("Hello"); } -
**!=**(not equal to).* Example: *if(name != "Bob") { Serial.println("Hi"); } -
**<**(less than).* Example: *if(health < 1) { Serial.println("Dead"); } -
**>**(greater than).* Example:*if(score > 50) { Serial.println("Yay"); } -
**<=**(less than or equal to).* Example:*if(health <= 0) { Serial.println("Dead"); } -
**>=**(greater than or equal to).* Example:*if(score >= 100) { Serial.println("You Win!"); }
Complete List of Operators
5. Control Structures

Manage the flow of execution* in your program!*
If
If this then that.
if(a > b) {
	// if a > b do this
}
if(a > b) {
	// if a > b do this
} else {
	// otherwise do this
}
if(a > b) {
	// if a > b do this
} else if(a < b) {
	// otherwise, if a < b do this
} else {
	// in all other cases, do this
}
🎓 Switch
For
Repeat a block of code a fixed number of times.
In the example below we make a LED blink 5 times at the start of the program
const int ledPin = 13;

void setup() {
    pinMode(ledPin, OUTPUT);

    for (int i = 0; i < 5; i++) {
        digitalWrite(ledPin, HIGH); // turn LED on
        delay(500);
        digitalWrite(ledPin, LOW); // turn LED off
        delay(500);
    }
}

void loop() {

}
While
Repeat a block of code while a condition remains true
Here’s an exciting example where we do nothing while we wait for a button to be pressed:
const int buttonPin = 2;

void setup() {
    pinMode(buttonPin, INPUT_PULLUP);
    Serial.begin(9600);
}

void loop() {
    // Wait for button press
    while (digitalRead(buttonPin) == HIGH) {
        // Do nothing until the button is pressed
    }

    // Button pressed!
    Serial.println("Button pressed.");
    delay(1000); // Debounce
}
🎓 Do-While
6. Functions / Methods

A function is a section of code that can be called from elsewhere in your code. Ideally your function has a descriptive name and does one specific thing.

Functions and Methods are the same thing. A Function that’s part of a Class or Object is called a Method
Calling functions
The Arduino library comes with many built-in functions to call:
delay(1000) - pauses the execution of the program for 1000ms (1 sec)
millis() - returns the time elapsed since the program started (in ms)
random(0, 10) - generates a random number between 0 and 10
abs(a), min(a, b), max(a, b) - basic math stuff (absolute value, minimum value, maximum value)
🎓 You can find a complete list here: https://www.arduino.cc/reference/en/#functions
Making your own functions
The signature of a function looks like this: return type function name ( arguments ) { content }
Here’s an example:
int add(int a, int b) {
	return a + b;
}
int is the return type - if you call this function you’ll get an integer number back from it.
add is the name of the function - this is how we call it from elsewhere
int a and int b are the two arguments we have to send along when we call this function.
return is a keyword that sends back a value to wherever the function was called from. This also ends the execution of the function. nothing below this in the function would execute.
Here is the same function in action:
// Define a function called "add" that takes two integer numbers as arguments
int add(int a, int b) {
	return a + b; // return the result of a + b
}

void setup() {
	int c = add(5, 8); // call the function and save the result in a new variable
	Serial.println(c); // output the result over Serial
	int d = add(12876, 3908234); // call the same function again with different arguments
	Serial.println(d);
}
🎓 Passing Values
🎓 Static Variables inside Functions
Serial Output/Input
Serial Output
How do we know if our microcontroller actually does what we want? The simples way is through a serial connection!
int count = 0;

void setup() {
	Serial.begin(9600); // start a serial connection at the given baud rate
}

void loop() {
	count++; // increment count
	Serial.println(count); // print a line to serial containing the current count
	delay(1000); // pause for 1 second
}
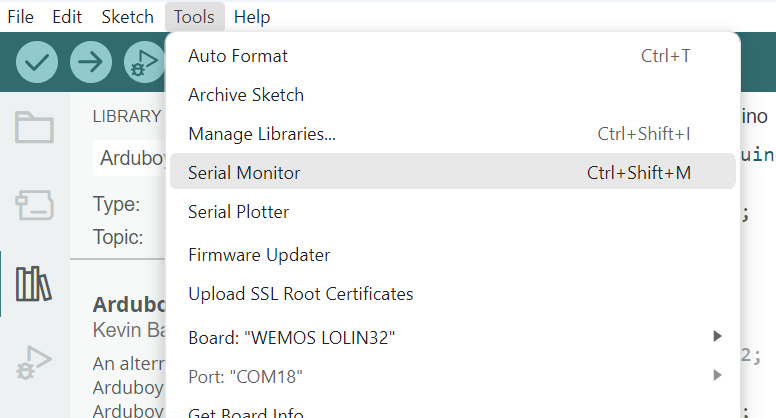
Now if we run this program we can open the Serial Monitor and watch what our microcontroller says!
Leave a comment