Arduino C++ by Example
Work in Progress
This page teaches you by example. The Arduino C++ page takes the opposite approach and explains all the basic concepts of programming, then gives appropriate examples. 🔀 Choose whichever you prefer!
Basics setup and Serial Output
-
setup()gets called once when you program starts -
loop()runs repeatedly again and again and again for as long as your program runs
Let’s make an example where we create a variable called count, increment it every second and print the current value to the Serial port, so we can see it in the Serial Monitor:
#include <Arduino.h>

int count = 0; // Declare an integer variable called count and initialize it to 0

// the setup function runs at the very start of the program
void setup() {
	Serial.begin(9600); // Initialize the serial port
	Serial.println("Hello world!"); // Print "Hello world!" to the serial port
}

// the loop function runs again and again and again for as long as your program runs
void loop() {
	count++; // Increment the value of count by 1
	Serial.println(count); // Print the value of count
	delay(1000); // Wait for 1 sec (1000 ms) before continuing
}
Now if we run this program we can open the Serial Monitor and watch the output of our microcontroller!
Serial Input
We can also send data back to our program via the Serial Monitor! In this next example we’re going to wait for the user to enter ‘1’ or ‘0’ and we’ll turn on an LED accordingly!
This example is set up for an 🎮 Arduboy** **with a common cathode RGB LED. If you want to use the 🔆 internal LED of your Arduino instead:
- Replace
const int ledPin = 10;withconst int ledPin = LED_BUILTIN;
- Switch
digitalWrite(ledPin, HIGH)anddigitalWrite(ledPin, LOW)since single color LEDs usually turn ON when the pin is set to HIGH and OFF when the pin is set to LOW
#include <Arduino.h>

const int ledPin = 10; // LED connected to digital pin 10. `const` means the value of `ledPin` can't be changed.

void setup() {
  pinMode(ledPin, OUTPUT); // set the mode of pin ledPin to be OUTPUT
  Serial.begin(9600); // Begin a serial connection at a baud rate of 9600
	delay(2000); // wait for 2 sec (2000 ms)
	Serial.println(); // print an empty line
	Serial.println("Enter '1' to turn on the LED, '0' to turn it off: "); // print instructions
}

void loop() {
  char userChoice; // create a variable of type char (can hold a single character)

  while (!Serial.available()) {} // Wait for user to press any key (do nothing while Serial has no new data available)
  userChoice = Serial.read(); // Read the user input into the userChoice variable

  switch (userChoice) { // Switch according to the contents of userChoice
    case '0': // if the user entered '0'
      digitalWrite(ledPin, HIGH); // set the ledPin to HIGH (5V)
			Serial.println("OFF"); // print "OFF"
      break; // exit out of the switch statement
    case '1': // if the user entered '1'
      digitalWrite(ledPin, LOW); // set the ledPin to LOW (0V)
			Serial.println("ON"); // print "ON"
      break; // exit out of the switch statement
		default: // if the user enterd anything else
			Serial.println("Invalid input");
			break; // exit out of the switch statement
  }
}
-
▶️ Run the program
-
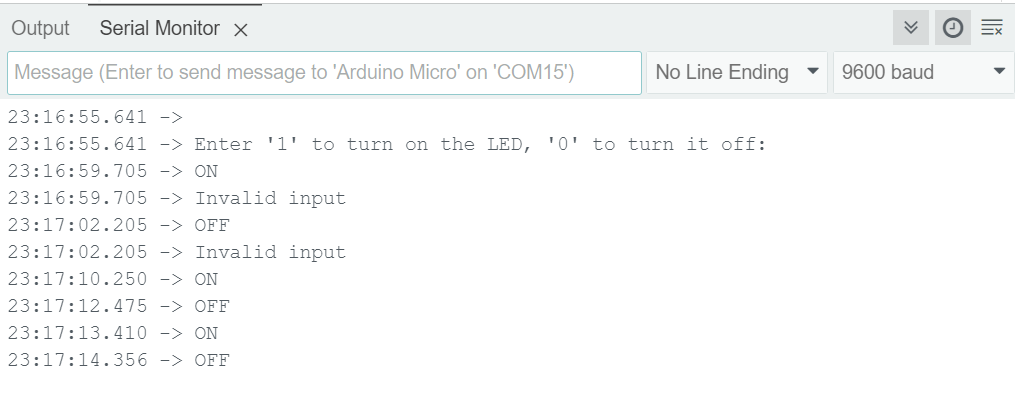
Open the Serial Monitor
-
Make sure it’s set to
9600 baud -
Set it to
No Line Ending -
Now enter
1or0into the Message field, press enter to submit and watch the LED turn on or off!
-
More Serial Input
This time we want to read a whole String, not just single characters! Let’s ask the user some questions!
#include <Arduino.h>

void setup() {
  Serial.begin(9600);
	delay(2000);
}

void loop() {
  String userName = ""; // a variable of type String (can hold text), called 'userName'
  int birthYear = 0; // a variable to hold an integer number

  Serial.println();
  Serial.println("Please enter your name");

  while (!Serial.available()) {} // Wait for user input to complete
  userName = Serial.readStringUntil('\n'); // Read the user input up until we encounter a newline character!

	Serial.println("Hello " + userName + "!"); // welcome the user by name!

  Serial.println(); // Print a newline
  Serial.println("What year were you born?");

  while(birthYear == 0) {
    while (!Serial.available()) {} // Wait for user input to complete
    String birthYearStr = Serial.readStringUntil('\n'); // Read the user input into a temporary variable
    birthYear = birthYearStr.toInt(); // convert to integer and save into the `birthYear` variable

    if(birthYear == 0) { // if the user input was not a valid number, the result will be 0
      Serial.println("It looks like you entered an invalid year. Please try again!");
      continue; // abort this loop and go back to the top and start the next while loop
    }

    int ageIn2050 = 2050 - birthYear; // calulate user age in 2050
    Serial.println("In the year 2050 you'll be " + (String)ageIn2050 + " years old."); // output the result
    // note how we have to cast `ageIn2050` to a String before we can use it in text!
  }
}
Leave a comment