React
React makes it painless to create interactive UIs on the web. Design simple views for each state in your application, and React will efficiently update and render just the right components when your data changes.
[React Router]
Once you know your way around React you might want to step up to Next.js
Set up
Option A: Create a starter project with npx create-react-app
Set up a project with npx create-react-app my-app (https://reactjs.org/docs/create-a-new-react-app.html)
Or if you prefer yarn, then yarn create react-app my-app
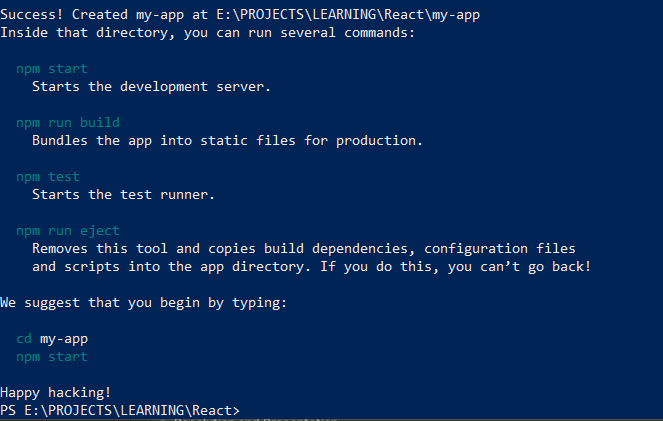
This creates a basic React project from the default template with everything you need.
There are many other templates as well.
-
Minimal (even more minimal)
npx create-react-app my-app --template minimal -
Minimal with Typescript:
npx create-react-app my-app --template minimal-typescript -
Template with React and Redux and Typescript:
npx create-react-app my-app --template redux-typescript -
Popular React boilerplate:
npx create-react-app my-app --template rb
Or maybe use this cleaned up version below:
Option B: Use this cleaned up starter project
Option Nope: Minimal React without JSX - stupid idea. WHY?
JSX
JSX Helps you write readable React code by inlining components so that they look like html-tags!
const element = <h1>Hello world</h1>;
Full example of a React component:
import React from 'react';

const App = () => {
  return (
    <h1>Hello <em>World</em>!</h1>;
  );
}
export default App;
This is a function component. And that’s the way to go. Don’t use class components anymore
Custom Components
Create component, export component, import component, use it.
Component name has to be uppercase! That’s als how you distinguish between built-in html components and React components: <CustomReactComponent> vs <html>
Components can only return one single element, so if you need to return multiple you can wrap them in a <div> or React’s <Fragment> (in newer versions a Fragment can just be <> </>)
import React from 'react';

const Link = () => {
  return (
      <p>
        <a href="//reactjs.org">Read more about React</a>
      </p>
  );
};

const App = () => {
  return ( // in braces so stupid JS doesn't think it's just a single line
    <>
      <Link />
      <Link />
      <Link />
    </>
  );
}

export default App;
Variables go in curly braces:
const DateTimeNow = () => {
    const dateTimeNow = new Date().toLocaleString();
    return <span>Current date and time is {dateTimeNow}.</span>;
}
You can also call functions in curly braces, etc.:
<p>Today is {new Date(Date.now()).toLocaleTimeString()}.</p>
Custom components can use properties (attributes) too:
const ProfileLink = (props) => {
  return (
    <a
      href={props.url}
      title={props.label}
      target="_blank">Profile
    </a>
  );
}

export default ProfileLink;
And then use just it like you would in HTML:
<ProfileLink url="/users/johnny" label="Profile for Johnny" />
The spread operator (…) is useful if you want to render all the properties…
// INSTEAD OF THIS:
return (
  <Post
    id={post.id}
    title={post.title}
    content={post.content}
  />
);

// YOU COULD BE DOING THIS:
return <Post {...post} />;
How to deal with child nodes:
import React from 'react';

const Link = (props) => {
  return (
    <a href={this.props.url}>
      {this.props.children}
    </a>
  );
};

const App = () => {
	return (
    <>
      <Link url="//reactjs.org">
        <strong>React</strong>
      </Link>
      <Link url="//vuejs.org">
        Vue
      </Link>
      <Link url="//angular.io">
        Angular
      </Link>
    </>
  );
};

export default App;
Use (abuse? 😉) how JS handles true/false by making our logical expressions return false or a react element (if isVerified is true it adds the Checkmark, otherwise it won’t):
const UserName = (props) => {
  return (
    <p>
      {this.props.username}
      {this.props.isVerified && <Checkmark />}
    </p>
  );
}
Instead of a switch statement we can use an object with properties for the different cases resolving the different outcomes (the || makes sure any unknown cases show as deleted):
const status2icon = {
  draft: <DraftIcon />,
  published: <PublishedIcon />,
  deleted: <TrashIcon />,
};

const PostStatus = (props) => {
	return (
    return status2icon[props.status] || status2icon.deleted;
  );
};
Show a list of options by mapping from a list of items
import React from 'react';

const App = () => {
	const items = ['apples', 'pears', 'playstations'];
  return <Select items={items} />;
};

const Select = (props) => {
  return (
    <select>
       {props.items.map(item => (
         <option key={item}>
           {item}
         </option>
       ))}
    </select>
  )
}

export default App;
Fragments **<></>** are empty React elements that result in no HTML. Their only purpose is to group multiple other elements together. (You might need this, because a component can only return a single element, so if you want multiple, wrap them in a Fragment…)
return (
  <>
    <h1>Hello and welcome</h1>
    <a href="/blog">Go to the blog</a>
  </>
);
Before React 16.2 you actually had to use <Fragment></Fragment>
Send tags through props via mixed arrays:
<Tier tier="1" tierName={["Tier 1 - the ", <i>BEST</i>, " tier!"]} />
CSS
JSX uses camelCase where CSS uses hyphens font-size → fontSize
Where in HTML/CSS you would set
<input style="font-size: 30pt;" />
in JSX you have to do
<input style={{ fontSize: '30pt' }} />
example of applying multiple styles:
<span style={{
  borderWidth: '1px',
  borderStyle: 'solid',
  borderColor: 'red',
}}>Red velvet cake is delicious</span>
You can also put the styles into a variable and then apply it:
function Button({ handleClick, label }) {
  const buttonStyle = {
    color: 'blue',
    border: '1px solid',
    background: 'transparent',
    borderRadius: '.25em',
    padding: '.5em',
    margin: '.5em',
  };
  return (
    <button style={buttonStyle} onClick={handleClick}>
      {label}
    </button>
  );
}
Or add css to a component by importing it at the top
import './ExpenseItem.css';
in JSX, use className instead of class!
SASS
Add it to project
$ npm i -g sass
Then you can simply import sass files into components and it will work!
import './Countdown.scss';
Events
<button onClick={console.log('Click');}>
In the example below, notice how we don’t have () when referring to clickHandler! If we had braces it would execute during rendering, not when clicked!
In the following example, note how the 3rd button fails and executes during rendering and not when clicked.
function TestComponent({ label }) {
    function logHelloHandler() {
        console.log(`Hello!`);
    }

    const logHiHandler = () => {
        console.log(`Hi`);
    }

    return (
        <>
            <button onClick={logHelloHandler} >Hello</button> // executes function when clicked
            <button onClick={logHiHandler} >Hi</button> // executes arrow-function when clicked
            <button onClick={console.log('hello')} >{label}</button> // WRONG! executes when JSX is assembeld, not when clicked!
        </>
    );
}

export default TestComponent;
But if we can’t have (), then how can we send along parameters?! Turn it into an arrow function like this: (Note how the 3rd button also works on click now that we turned it into an arrow function!)
function TestComponent({ label }) {
    function logHelloHandler( name ) {
        console.log(`Hello ${name}!`);
    }

    const logHiHandler = ( name ) => {
        console.log(`Hi ${name}`);
    }

    return (
        <>
            <button onClick={() => logHelloHandler(label)} >Hello {label}</button>
            <button onClick={() => logHiHandler(label)} >Hi {label}</button>
            <button onClick={() => console.log('hello')} >hello</button>
        </>
    );
}

export default TestComponent;
Gotchas
What things render as
Notably only 4 of the things that are falsy render as empty strings, while 0 renders as “0” and NaN as “NaN”. This could lead to issues when you do stuff like this:
return (
  {props.items.length && <button>Checkout</button>} // NOTE: if items.length is 0, it renders "0" instead of returning nothing
);
so you have to do this instead:
return (
  {props.items.length > 0 && <button>Checkout</button>} // FIXED
);
Multi-word Attributes
Multi-word attributes also switch to camelCase in JSX. clip-path → clipPath, fill-opacity → fillOpacity , etc.
And confusingly even multi-word attributes that are all lowercase in HTML, switch to camelCase: autoplay → autoPlay, allowfullscreen → allowFullscreen, or input field’s maxlength → maxLength
Reserved Names
class and for are reserved words in JavaScript, so in JSX you have to use className and htmlFor instead.
If you want to assign a CSS class:
<p className="hidden">...</p>
If you need to create a label for a form element:
<input type="checkbox" id={this.props.id} value="hasCorgi" />
<label htmlFor={this.props.id}>Corgi?</label>
Boolean Attribute Values
The attribute value must be set as a JavaScript expression (inside {}) and not as a string!
<input disabled={false} />
If you omit a value after the property, React will set the value to true
<input disabled /> //disabled will be true!
Functional components
As mentioned at the top: Use only functional components - they are the way forward. Below we’ll look at class components 😷 and why we hate them now.
Leave a comment