Next.js
date
Dec 30, 2022
type
KnowledgeBase
year
slug
nextjs
status
Published
tags
React
Next.js
summary
Get into Next.js, essentially a better React built by Vercel
Next.js is a flexible full-stack React framework that gives you building blocks to create fast web applications. It solves common problems and makes building React apps easier!
🌐 → https://nextjs.org/
Unlike pure React - Next doesn’t just run in the browser, we need a server for the server-side rendering parts! You can, however, use
next export to export to static HTML if you don’t need any of the server features.API Routes - allow you to build an API that runs on the server
Next.js handles the tooling and configuration needed for React, and provides additional structure, features, and optimizations for your application.
You can use React to build your UI, then incrementally adopt Next.js features to solve common application requirements such as routing, data fetching, integrations - all while improving the developer and end-user experience.
Key Features:
- File-based Routing (which makes it a bit of an alternative to React Router)
- Server-side rendering + Data Fetching
Installation
Set it up from a template 🏆
$ npx create-next-app my-next-app --template defaultOr go the complicated way and start from scratch…
$ npm install react react-dom nextrun via
$ npm next dev or add "dev": "next dev" to the scripts section of package.json, then you can do $ npm run dev to the same effectPages / Routing
This will continue to work, but they just introduced the app directory as an even better way to do this (see further below).
A page is a react component in the
pages directory.Each page is automatically associated with a route based on its file name.
Example: If you create
pages/about.js that exports a React component like below, it will be accessible at /about.Supports dynamic routes! If you create a file called
pages/posts/[id].js, then it will be accessible at posts/1, posts/2, etc.The path parameter will be merged with the query parameters, so
/post/abc?foo=bar will have the following query object:Catch-all routes:
pages/post/[...slug].js matches /post/a, but also /post/a/b, /post/a/b/c and so on.index > root: The router will automatically route files named
index to the root of the directory.pages/index.js→/
pages/blog/index.js→/blog
Shallow routing → Docs
Link between pages using the
<Link> component:Link to dynamic paths:
app Directory / NEW Router
This is the new way of doing things, introduced in Next.js 13
app directory instead of pages. Routes are defined by folders, not files.All components in the
app directory are React Server Components by default (meaning they will be rendered on the server rather than on the client (Browser))In the
app directory:- 📁 Folders are used to define routes. A route is a single path of nested folders, following the hierarchy from the root folder down to a final leaf folder.
- Files are used to create UI that is shown for the route segment.

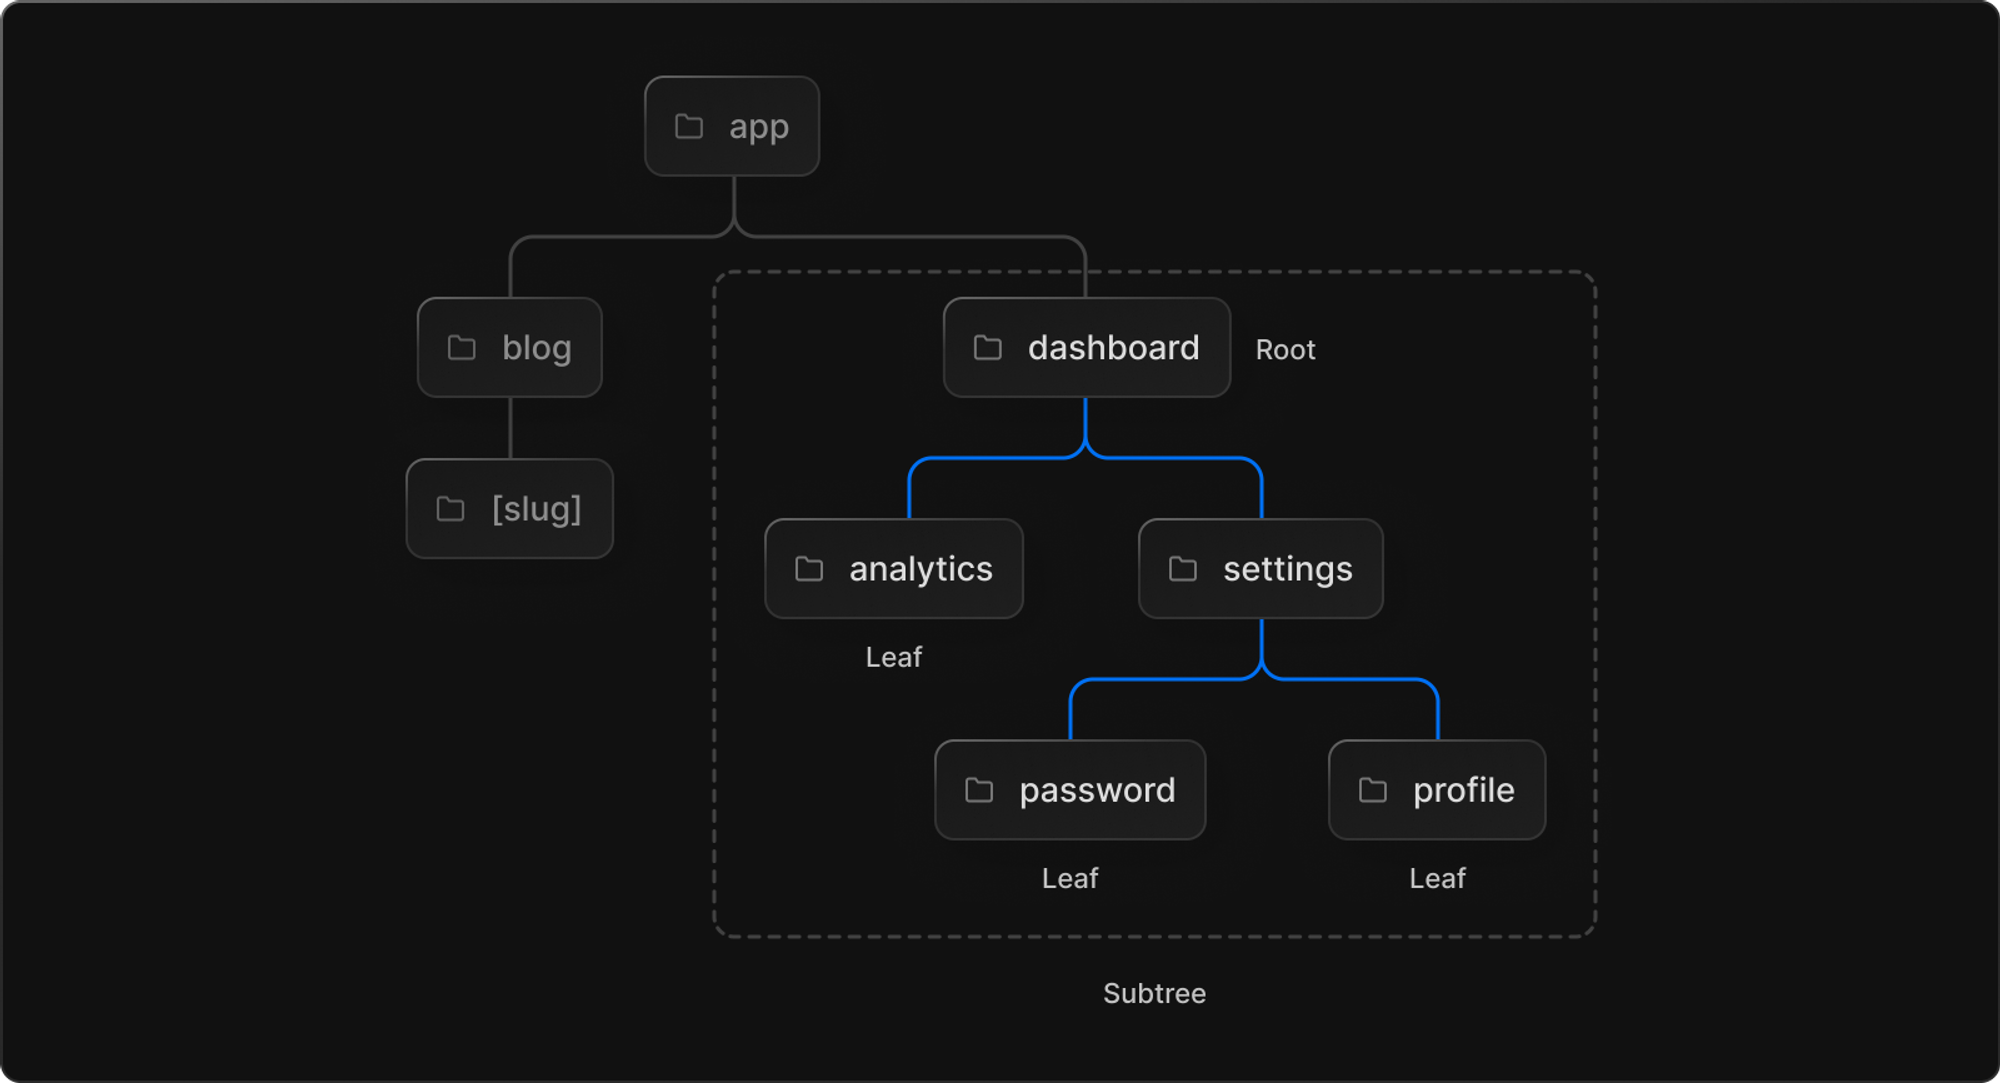
Next.js provides a set of special files that you can use in your routes. These files are:

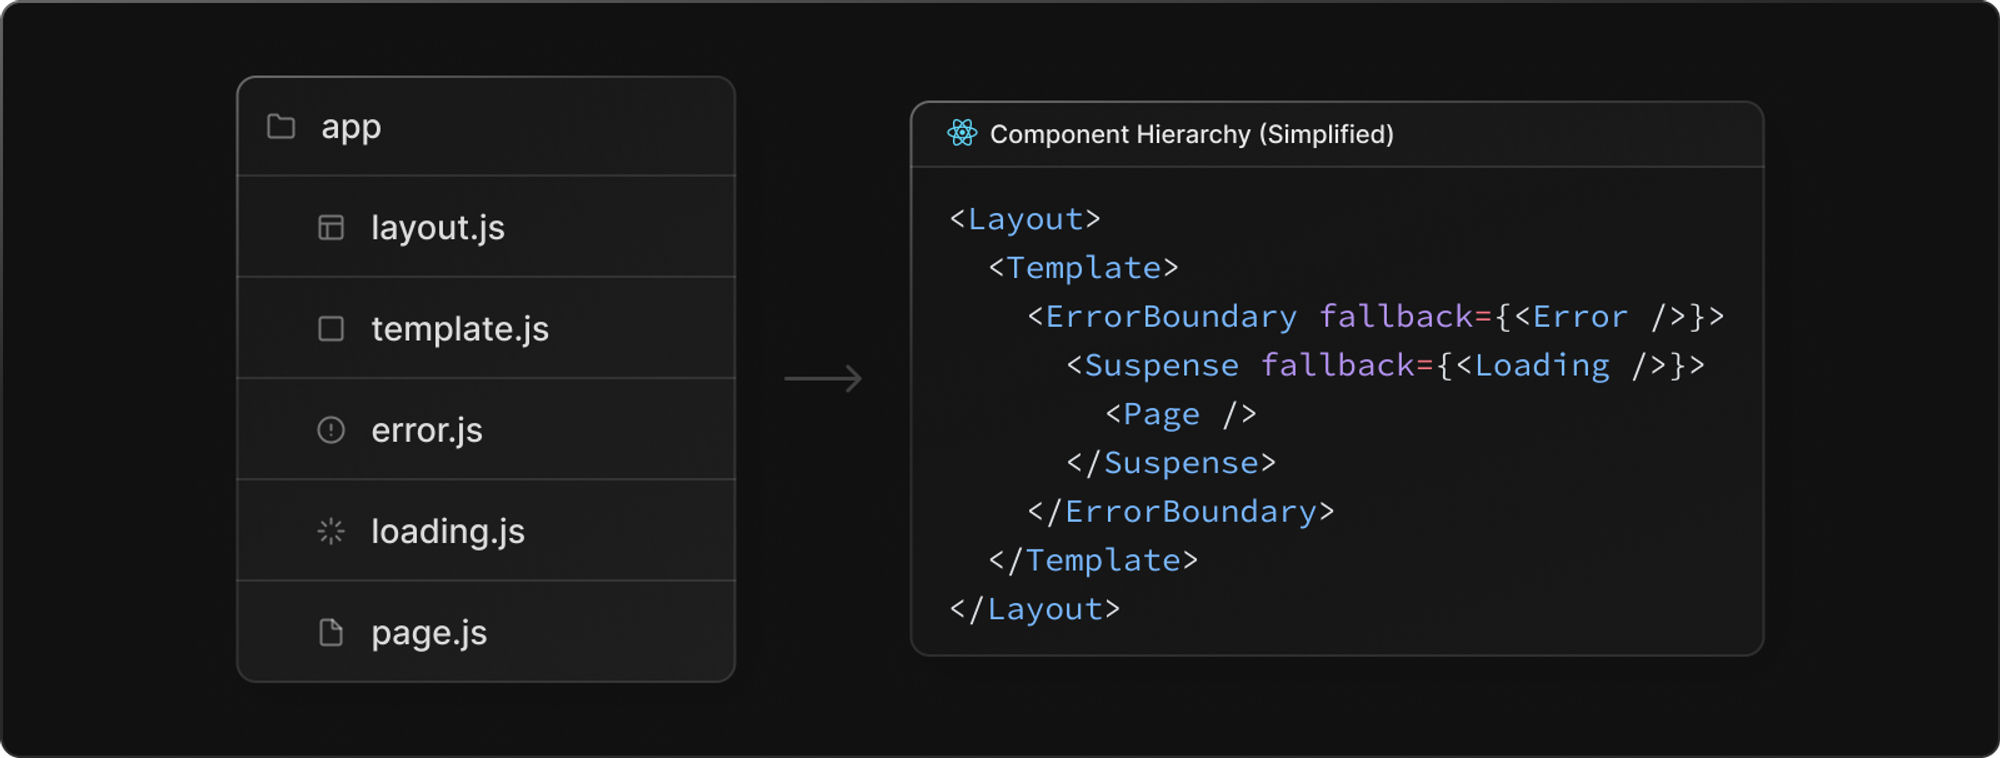
These work with
js, jsx or tsx- ➡️ page.tsx: A file used to define the unique UI of a route. Pages represent the leaf of the route and are needed for the path to be accessible.
- layout.tsx: A file used to define UI that is shared across multiple pages. A layout accepts another layout or a page as its child. You can nest layouts to create nested routes.
- loading.tsx: An optional file used to create loading UI for a specific part of an app. It automatically wraps a page or child layout in a React Suspense Boundary, showing your loading component immediately on the first load and when navigating between sibling routes.
- error.tsx: An optional file used to isolate errors to specific parts of an app, show specific error information, and functionality to attempt to recover from the error. It automatically wraps a page or child layout in a React Error Boundary. Showing your error component whenever an error in a subtree is caught.
- template.tsx: An optional file, similar to layouts, but on navigation, a new instance of the component is mounted and the state is not shared. You can use templates for cases where you require their behavior, such as enter/exit animations.
- head.tsx: An optional file used to define the contents of the
<head>tag for a given route.
In addition to special files, you have the option to colocate your own files inside folders. For example:
- stylesheets
- tests
- components
- etc.
Unlike earlier versions, this uses server-side routing instead of client-side routing
Client vs Server Components
If you want a component to be client-rendered, add
use client; to the top of the file:When to use Server Components vs Client Components
What do you need to do? | Server Component | Client Component |
Fetch data. Learn more. | ✅ | |
Access backend resources (directly) | ✅ | ❌ |
Keep sensitive information on the server (access tokens, API keys, etc) | ✅ | ❌ |
Keep large dependencies on the server / Reduce client-side JavaScript | ✅ | ❌ |
Add interactivity and event listeners ( onClick(), onChange(), etc) | ❌ | ✅ |
Use State and Lifecycle Effects ( useState(), useReducer(), useEffect(), etc) | ❌ | ✅ |
Use browser-only APIs | ❌ | ✅ |
Use custom hooks that depend on state, effects, or browser-only APIs | ❌ | ✅ |
❌ | ✅ |
Pre-rendering Pages
By default, Next.js pre-renders every page. Two ways to choose from:
- Static Generation (recommended) - HTML is generated at build-time.
To make a page use Static Generation, either export the page component, or export
getStaticProps(andgetStaticPathsif necessary) - without data - static page, just renders to one html file
- with data:
- Your page content depends on external data: Use
getStaticProps. - Your page paths depend on external data: Use
getStaticPaths(usually in addition togetStaticProps).
- Server-side rendering - HTML is generated on each request
- To use Server-side Rendering for a page, you need to
exportanasyncfunction calledgetServerSideProps. This function will be called by the server on every request.
All this is great, but can cause trouble if you’re not careful! (Unfold for details)
For example this code will throw an error


The reason is not quite obvious at first, since we’re using state and effect. BUT we’re setting the initial state outside of the effect, so the pre-rendered page is different. If we make sure we only set state in effect, we’re fine:
Data Fetching

Built-in CSS Support
Next.js extends the concept of
import beyond JavaScript. Global Stylesheet: will be applied to everything, import inside
pages/_app.js via import '../styles.css' (+ will be hot-reloaded during dev!)Component-Level CSS:
[name].module.css naming schema. CSS Modules locally scope CSS by automatically creating a unique class name. This allows you to use the same CSS class name in different files without worrying about collisions.Example
For example, consider a reusable
Button component in the components/ folder:First, create
components/Button.module.css with the following content:Then, create
components/Button.js, importing and using the above CSS file:Styled JSX
Styled JSX is an easy way to throw some CSS int he mix → https://github.com/vercel/styled-jsx#global-styles
For example: if you need to change the style of the body element, which is usually the same for every page, so you can’t get to it that easily per page… but just do this in any JSX and you’re good:
SASS
Layouts
You can do a single shared layout for the entire app by adding it to
pages/_app.js:pages/_app.js is special. <Component> is always the current page being rendered, so if you wrap your Layout around it, it will always be there.Or we can do per page layouts like this:
Image Optimization
Next.js will automatically determine the
width and height of your image based on the imported file.Local images:
- Use the
next/image<Image>component:import Image from 'next/image';
- static-import your image:
import profilePic from '../public/me.png';
Remote images:
Next.js does not have access to remote files during the build process, so you'll need to provide the
width, height and optional blurDataURL props manually:You should add the
priority property to the image that will be the Largest Contentful Paint (LCP) element for each page.Font Optimization
Next inlines font CSS during
next buildServe static files
Just put it into the
public folder. Then. you can simply do this:This folder is also useful for
robots.txt, favicon.ico, Google Site Verification, and any other static files (including .html)!Environment Variables
Next.js has built-in support for loading environment variables from
.env.local into process.env.An example
.env.local:This loads
process.env.DB_HOST, process.env.DB_USER, and process.env.DB_PASS into the Node.js environment automatically allowing you to use them in Next.js data fetching methods and API routes.For example, using
getStaticProps:Note: Next.js will automatically expand variables (
$VAR) inside of your .env* files. This allows you to reference other secrets, like so:API Routes
Any file inside the folder
pages/api is mapped to /api/* and will be treated as an API endpoint instead of a page. They are server-side only bundles and won't increase your client-side bundle size.For example, the following API route
pages/api/user.js returns a json response with a status code of 200:For an API route to work, you need to export a function as default (a.k.a request handler), which then receives the following parameters:
req: An instance of http.IncomingMessage, plus some pre-built middlewares
res: An instance of http.ServerResponse, plus some helper functions
To handle different HTTP methods in an API route, you can use
req.method in your request handler, like so:Dynamic API Routes
Dynamic routes follow the same file naming rules as pages.
For example, the API route
pages/api/post/[pid].js has the following code:Now, a request to
/api/post/abc will respond with the text: Post: abc.A very common RESTful pattern is to set up routes like this:
GET api/posts- gets a list of posts, probably paginated
GET api/posts/12345- gets post id 12345
We can model this in two ways:
- Option 1:
/api/posts.js/api/posts/[postId].js
- Option 2:
/api/posts/index.js/api/posts/[postId].js
Both are equivalent.
Catch all API routes
API Routes can be extended to catch all paths by adding three dots (
...) inside the brackets. For example:pages/api/post/[...param].jsmatches/api/post/a, but also/api/post/a/b,/api/post/a/b/cand so on.
Matched parameters will be sent as a query parameter (
param in the example, but could be anything) to the page, and it will always be an array, so, the path /api/post/a/b will have the following query object:{ "param": ["a", "b"] }An API route for
pages/api/post/[...slug].js could look like this:Now, a request to
/api/post/a/b/c will respond with the text: Post: a, b, c.Catch all routes can be made optional by including the parameter in double brackets (
[[...slug]]).Request Helpers
API Routes provide built-in request helpers which parse the incoming request (
req):req.cookies- An object containing the cookies sent by the request. Defaults to{}
req.query- An object containing the query string. Defaults to{}
req.body- An object containing the body parsed bycontent-type, ornullif no body was sent
Every API Route can export a
config object to change the default configuration, which is the following:More info here.
Response Helpers
The Server Response object, (often abbreviated as
res) includes a set of Express.js-like helper methods to improve the developer experience and increase the speed of creating new API endpoints.The included helpers are:
res.status(code)- A function to set the status code.codemust be a valid HTTP status code
res.json(body)- Sends a JSON response.bodymust be a serializable object
res.send(body)- Sends the HTTP response.bodycan be astring, anobjector aBuffer
res.redirect([status,] path)- Redirects to a specified path or URL.statusmust be a valid HTTP status code. If not specified,statusdefaults to "307" "Temporary redirect".
res.revalidate(urlPath)- Revalidate a page on demand usinggetStaticProps.urlPathmust be astring.
Authentication
Example using iron-session: https://github.com/vercel/next.js/tree/canary/examples/with-iron-session
BUT there’s also NextAuth.js, which we should explore…
NextAuth.jsEnvironment Variables
Define variables in an
.env.local file.Then you can read them in
getStaticProps (which gets called at build-time) Whatever you
return from getStaticProps will be handed to the page as props, so we can destructure what we returned above.Or you can expose variables directly to the browser by prefixing their names with
NEXT_PUBLIC_