React

date
Nov 30, 2022
type
KnowledgeBase
year
slug
react
status
Published
tags
React
JavaScript
summary
All about React and React Router
💡
React makes it painless to create interactive UIs on the web. Design simple views for each state in your application, and React will efficiently update and render just the right components when your data changes.
React Router
React Router
Once you know your way around React you might want to step up to Next.js

Set up

Option A: Create a starter project with npx create-react-app

Set up a project with npx create-react-app my-app (https://reactjs.org/docs/create-a-new-react-app.html)
Or if you prefer yarn, then yarn create react-app my-app
notion imagenotion image
This creates a basic React project from the default template with everything you need.
There are many other templates as well.
  • Minimal (even more minimal) npx create-react-app my-app --template minimal
  • Minimal with Typescript: npx create-react-app my-app --template minimal-typescript
  • Template with React and Redux and Typescript: npx create-react-app my-app --template redux-typescript
  • Popular React boilerplate: npx create-react-app my-app --template rb
Or maybe use this cleaned up version below:

Option B: Use this cleaned up starter project

(from the react course on Udemy)
  • run npm install
  • open folder in VSCode or WebStorm
  • Terminal > New Terminal (VSCode) or click on the Terminal tab on the bottom (WebStorm)
  • npm start
 
What this contains is basically this:
/ public/ index.html src/ index.js App.js package.json
  • files in the public folder will be served directly via the web server
    • index.html is an HTML5 file with a <div id="root"></div> in the body. React will replace this with whatever content you make it render!
  • The src folder contains everything you want to bundle as a single package. Javascript, CSS, icons, JSON files, etc.
    • Bundling starts at index.js.
    • The main application file is usually called App.js
  • package.json is the main configuration file for the project, required by npm
index.html:
<!DOCTYPE html> <html lang="en"> <head> <meta charset="utf-8" /> <link rel="icon" href="%PUBLIC_URL%/favicon.ico" /> <meta name="viewport" content="width=device-width, initial-scale=1" /> <meta name="theme-color" content="#000000" /> <meta name="description" content="Web site created using create-react-app" /> <link rel="apple-touch-icon" href="%PUBLIC_URL%/logo192.png" /> <!-- manifest.json provides metadata used when your web app is installed on a user's mobile device or desktop. See https://developers.google.com/web/fundamentals/web-app-manifest/ --> <link rel="manifest" href="%PUBLIC_URL%/manifest.json" /> <!-- Notice the use of %PUBLIC_URL% in the tags above. It will be replaced with the URL of the `public` folder during the build. Only files inside the `public` folder can be referenced from the HTML. Unlike "/favicon.ico" or "favicon.ico", "%PUBLIC_URL%/favicon.ico" will work correctly both with client-side routing and a non-root public URL. Learn how to configure a non-root public URL by running `npm run build`. --> <title>React App</title> </head> <body> <noscript>You need to enable JavaScript to run this app.</noscript> <div id="root"></div> <!-- This HTML file is a template. If you open it directly in the browser, you will see an empty page. You can add webfonts, meta tags, or analytics to this file. The build step will place the bundled scripts into the <body> tag. To begin the development, run `npm start` or `yarn start`. To create a production bundle, use `npm run build` or `yarn build`. --> </body> </html>
index.js:
import ReactDOM from 'react-dom'; import './index.css'; import App from './App'; ReactDOM.render(<App />, document.getElementById('root'));
App.js:
function App() { return ( <div> <h2>Let's get started!</h2> </div> ); } export default App;

Option Nope: Minimal React without JSX - stupid idea. WHY?

<!DOCTYPE html> <html> <head> <script src="//unpkg.com/react@17/umd/react.development.js"></script> <script src="//unpkg.com/react-dom@17/umd/react-dom.development.js"></script> </head> <body> <div id="root"></div> <script type="text/javascript"> const reactElement = React.createElement('h1', null, 'Hello world!!!'); const domNode = document.getElementById('root'); ReactDOM.render(reactElement, domNode); </script> </body> </html>
This is stupid. Why wouldn’t we use JSX?! But oh well…
Put it in a folder somewhere and run a simple web server from that folder. There are many options:
  • run npx serve (node)
  • run npx http-server (node)
  • run python -m SimpleHTTPServer 3000 (Python 2)
  • run python -m http.server 3000 (Python 3)
  • run php -S localhots:3000 (PHP)

JSX

ℹ️
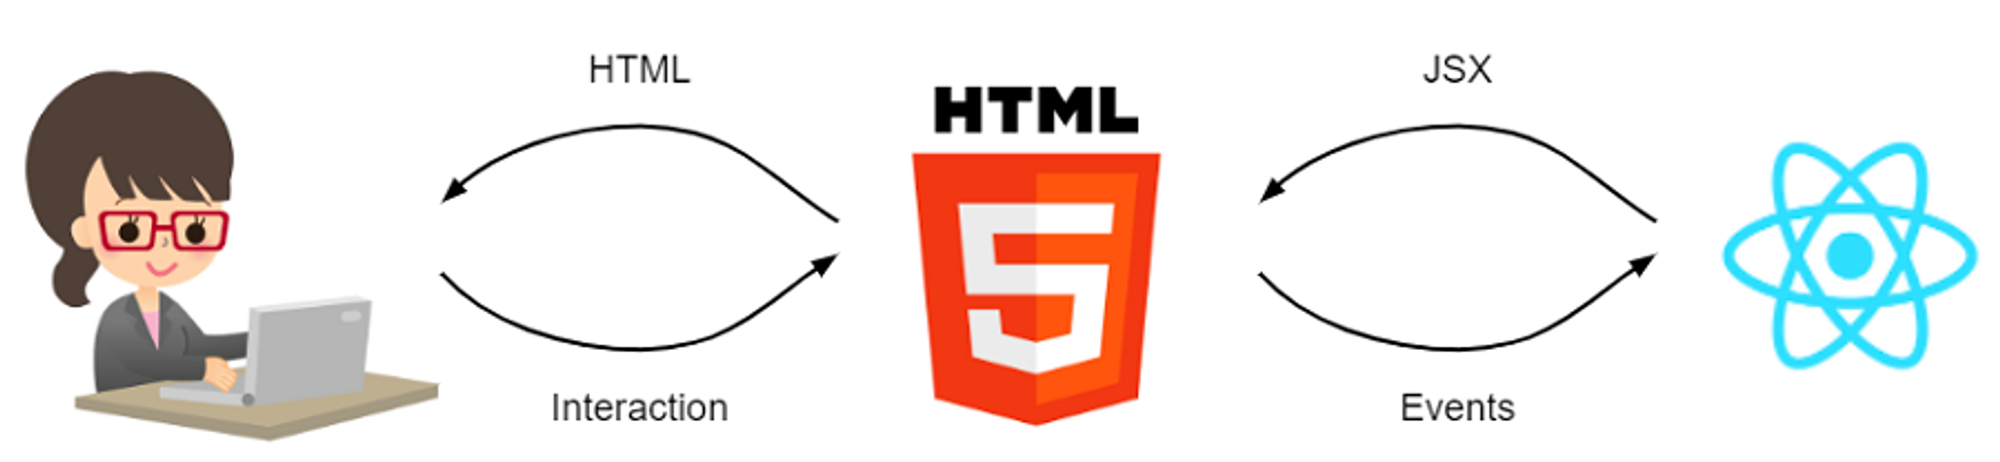
JSX Helps you write readable React code by inlining components so that they look like html-tags!
const element = <h1>Hello world</h1>;
Full example of a React component:
import React from 'react'; const App = () => { return ( <h1>Hello <em>World</em>!</h1>; ); } export default App;
This is a function component. And that’s the way to go. Don’t use class components anymore

Custom Components

Create component, export component, import component, use it.
Component name has to be uppercase! That’s als how you distinguish between built-in html components and React components: <CustomReactComponent> vs <html>
Components can only return one single element, so if you need to return multiple you can wrap them in a <div> or React’s <Fragment> (in newer versions a Fragment can just be <> </>)
import React from 'react'; const Link = () => { return ( <p> <a href="//reactjs.org">Read more about React</a> </p> ); }; const App = () => { return ( // in braces so stupid JS doesn't think it's just a single line <> <Link /> <Link /> <Link /> </> ); } export default App;
Variables go in curly braces:
const DateTimeNow = () => { const dateTimeNow = new Date().toLocaleString(); return <span>Current date and time is {dateTimeNow}.</span>; }
You can also call functions in curly braces, etc.:
<p>Today is {new Date(Date.now()).toLocaleTimeString()}.</p>
Custom components can use properties (attributes) too:
const ProfileLink = (props) => { return ( <a href={props.url} title={props.label} target="_blank">Profile </a> ); } export default ProfileLink;
And then use just it like you would in HTML:
<ProfileLink url="/users/johnny" label="Profile for Johnny" />
The spread operator () is useful if you want to render all the properties…
// INSTEAD OF THIS: return ( <Post id={post.id} title={post.title} content={post.content} /> ); // YOU COULD BE DOING THIS: return <Post {...post} />;
How to deal with child nodes:
import React from 'react'; const Link = (props) => { return ( <a href={this.props.url}> {this.props.children} </a> ); }; const App = () => { return ( <> <Link url="//reactjs.org"> <strong>React</strong> </Link> <Link url="//vuejs.org"> Vue </Link> <Link url="//angular.io"> Angular </Link> </> ); }; export default App;
Use (abuse? 😉) how JS handles true/false by making our logical expressions return false or a react element (if isVerified is true it adds the Checkmark, otherwise it won’t):
const UserName = (props) => { return ( <p> {this.props.username} {this.props.isVerified && <Checkmark />} </p> ); }
Instead of a switch statement we can use an object with properties for the different cases resolving the different outcomes (the || makes sure any unknown cases show as deleted):
const status2icon = { draft: <DraftIcon />, published: <PublishedIcon />, deleted: <TrashIcon />, }; const PostStatus = (props) => { return ( return status2icon[props.status] || status2icon.deleted; ); };
Show a list of options by mapping from a list of items
import React from 'react'; const App = () => { const items = ['apples', 'pears', 'playstations']; return <Select items={items} />; }; const Select = (props) => { return ( <select> {props.items.map(item => ( <option key={item}> {item} </option> ))} </select> ) } export default App;
Fragments <></> are empty React elements that result in no HTML. Their only purpose is to group multiple other elements together. (You might need this, because a component can only return a single element, so if you want multiple, wrap them in a Fragment…)
return ( <> <h1>Hello and welcome</h1> <a href="/blog">Go to the blog</a> </> );
Before React 16.2 you actually had to use <Fragment></Fragment>
Send tags through props via mixed arrays:
<Tier tier="1" tierName={["Tier 1 - the ", <i>BEST</i>, " tier!"]} />

CSS

JSX uses camelCase where CSS uses hyphens font-sizefontSize
Where in HTML/CSS you would set
<input style="font-size: 30pt;" />
in JSX you have to do
<input style={{ fontSize: '30pt' }} />
example of applying multiple styles:
<span style={{ borderWidth: '1px', borderStyle: 'solid', borderColor: 'red', }}>Red velvet cake is delicious</span>
You can also put the styles into a variable and then apply it:
function Button({ handleClick, label }) { const buttonStyle = { color: 'blue', border: '1px solid', background: 'transparent', borderRadius: '.25em', padding: '.5em', margin: '.5em', }; return ( <button style={buttonStyle} onClick={handleClick}> {label} </button> ); }
Or add css to a component by importing it at the top
import './ExpenseItem.css';
in JSX, use className instead of class!

SASS

SASS
SASS
Add it to project
$ npm i -g sass
Then you can simply import sass files into components and it will work!
import './Countdown.scss';

Events

<button onClick={console.log('Click');}>
⚠️
In the example below, notice how we don’t have () when referring to clickHandler! If we had braces it would execute during rendering, not when clicked!
In the following example, note how the 3rd button fails and executes during rendering and not when clicked.
function TestComponent({ label }) { function logHelloHandler() { console.log(`Hello!`); } const logHiHandler = () => { console.log(`Hi`); } return ( <> <button onClick={logHelloHandler} >Hello</button> // executes function when clicked <button onClick={logHiHandler} >Hi</button> // executes arrow-function when clicked <button onClick={console.log('hello')} >{label}</button> // WRONG! executes when JSX is assembeld, not when clicked! </> ); } export default TestComponent;
But if we can’t have (), then how can we send along parameters?! Turn it into an arrow function like this: (Note how the 3rd button also works on click now that we turned it into an arrow function!)
function TestComponent({ label }) { function logHelloHandler( name ) { console.log(`Hello ${name}!`); } const logHiHandler = ( name ) => { console.log(`Hi ${name}`); } return ( <> <button onClick={() => logHelloHandler(label)} >Hello {label}</button> <button onClick={() => logHiHandler(label)} >Hi {label}</button> <button onClick={() => console.log('hello')} >hello</button> </> ); } export default TestComponent;

Gotchas

What things render as

Type
Output
“string”
"string”
"”
"”
3.4
"3.4”
0
"0”
NaN
"NaN”
Number.POSITIVE_INFINITY
"Infinity”
Number.NEGATIVE_INFINITY
"-Infinity”
true
"true”
false
"”
undefined
“”
null
“”
Notably only 4 of the things that are falsy render as empty strings, while 0 renders as “0” and NaN as “NaN”. This could lead to issues when you do stuff like this:
return ( {props.items.length && <button>Checkout</button>} // NOTE: if items.length is 0, it renders "0" instead of returning nothing );
so you have to do this instead:
return ( {props.items.length > 0 && <button>Checkout</button>} // FIXED );

Multi-word Attributes

Multi-word attributes also switch to camelCase in JSX. clip-pathclipPath, fill-opacityfillOpacity , etc.
And confusingly even multi-word attributes that are all lowercase in HTML, switch to camelCase: autoplayautoPlay, allowfullscreenallowFullscreen, or input field’s maxlengthmaxLength

Reserved Names

class and for are reserved words in JavaScript, so in JSX you have to use className and htmlFor instead.
If you want to assign a CSS class:
<p className="hidden">...</p>
If you need to create a label for a form element:
<input type="checkbox" id={this.props.id} value="hasCorgi" /> <label htmlFor={this.props.id}>Corgi?</label>

Boolean Attribute Values

The attribute value must be set as a JavaScript expression (inside {}) and not as a string!
<input disabled={false} />
If you omit a value after the property, React will set the value to true
<input disabled /> //disabled will be true!

Functional components

As mentioned at the top: Use only functional components - they are the way forward. Below we’ll look at class components 😷 and why we hate them now.
Example:
This HTML menu
notion imagenotion image
 
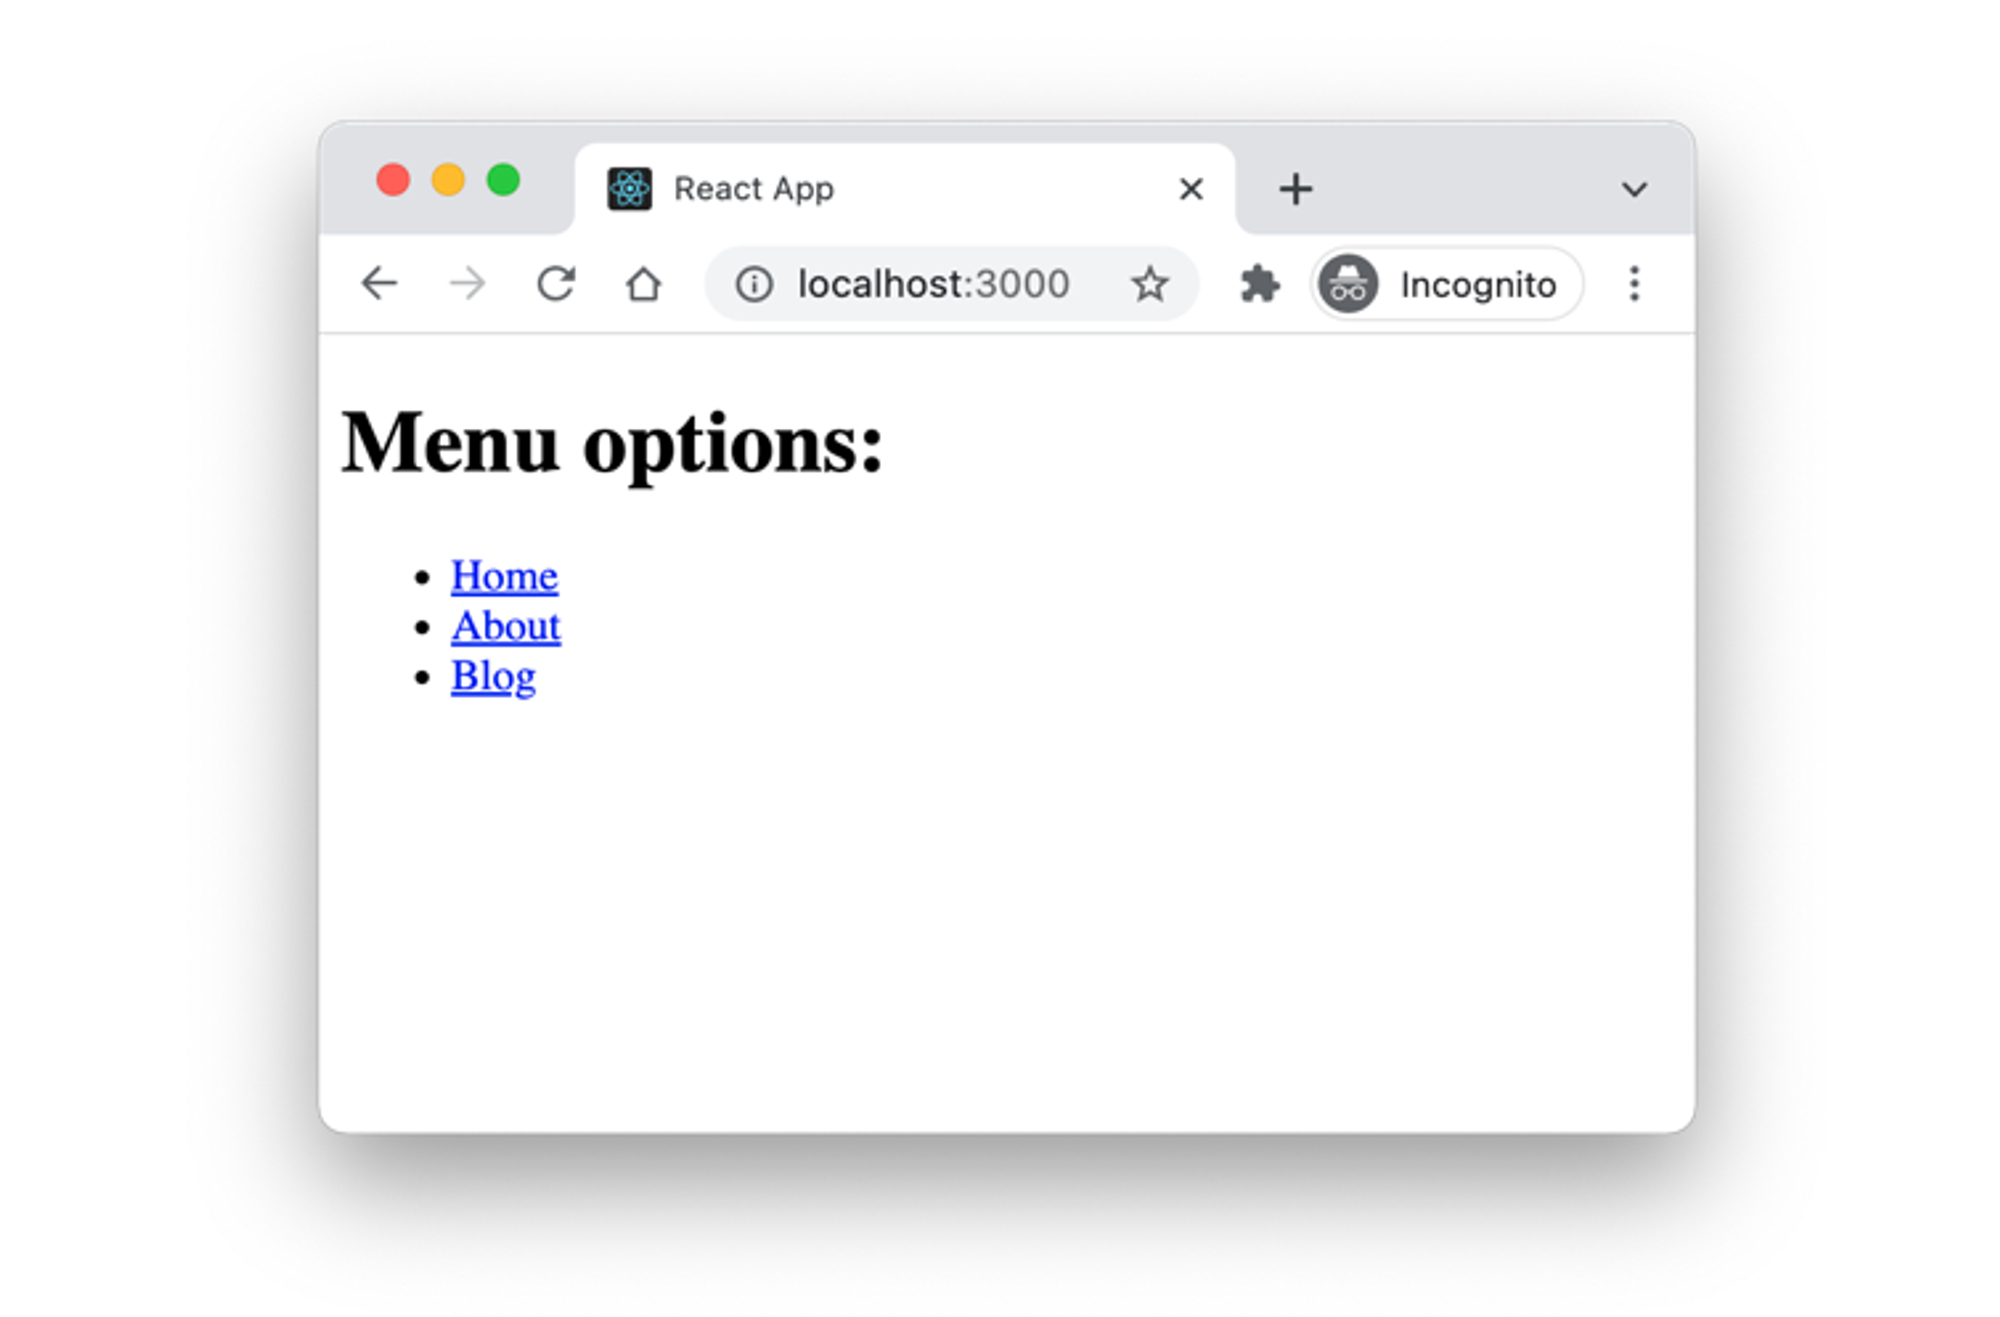
built with class components looked like this:
import { Component } from 'react'; class App extends Component { render() { return ( <main> <h1>Menu options:</h1> <Menu /> </main> ); } } class Menu extends Component { render() { return ( <ul> <MenuItem label="Home" href="/" /> <MenuItem label="About" href="/about/" /> <MenuItem label="Blog" href="/blog" /> </ul> ); } } class MenuItem extends Component { render() { return ( <li> <a href={this.props.href} title={this.props.label} > {this.props.label} </a> </li> ); } }
But built with functional components it looks like this! Much more compact and clean!
function App() { return ( <main> <h1>Menu options:</h1> <Menu /> </main> ); } function Menu() { return ( <ul> <MenuItem label="Home" href="/" /> <MenuItem label="About" href="/about/" /> <MenuItem label="Blog" href="/blog" /> </ul> ); } function MenuItem(props) { // Access to props! return ( <li> <a href={props.href} title={props.label}> {props.label} </a> </li> ); }
And if we’re extra cool we can even turn them into Arrow Function Components! (You know you want to…)
const App = () => { return ( <main> <h1>Menu options:</h1> <Menu /> </main> ); }; const Menu = () => { return ( <ul> <MenuItem label="Home" href="/" /> <MenuItem label="About" href="/about/" /> <MenuItem label="Blog" href="/blog" /> </ul> ); }; const MenuItem = (props) => { // Access to props! return ( <li> <a href={props.href} title={props.label}> {props.label} </a> </li> ); };
We simply create a function and return JSX, that’s it! Functional component!
If we need access to properties, we get it through the single argument passed to the function, which is a frozen object of properties.
Any value that can be executed as a function, that returns JSX, can be used as a component! You can even define them inline in another component:
const App = function() { const Menu = () => { return <ul /> }; return ( <main> <h1>Menu options:</h1> <Menu /> </main> ); }
we could even shorten it further using implicit return:
const Menu = () => <ul />; //this is a fully valid React component

Destructuring Properties

Destructuring allows us to pick out the things we need from the single argument that is passed to our functional component:
function MenuItem({ href, label }) { return ( <li> <a href={href} title={label}> {label} </a> </li> ); }
We can also use this in normal functions btw:
function log({ message, level }) { // pick out what we need console.log(level.toUpperCase(), " Message:", message); } log({ message: "Unknown product", level: "error" }); //call with an object containing the relevant stuff

Default Values

We can add default values by adding them to the function definition like this:
function Menu() { return ( <ul> <MenuItem label="Home" href="/"/> <MenuItem label="About" href="/about/" /> <MenuItem label="Blog" href="/blog" target="_blank" /> </ul> ); } function MenuItem({ label, href, target="_self" }) { // <--- HERE! return ( <li> <a href={href} title={label} target={target}> {label} </a> </li> ); }
If we have some props we just want to pass through we can do this via Rest operator:
function Menu() { return ( <ul> <MenuItem label="Home" href="/" className="logo" /> <MenuItem label="About" href="/about/" id="about-link" /> <MenuItem label="Blog" href="/blog" target="_blank" id="blog-link" /> </ul> ); } function MenuItem({ label, href, ...rest }) { // Funnel the rest into "rest" return ( <li> <a href={href} title={label} {...rest}> // then spread the "rest" back out {label} </a> </li> ); }

Hooks

ℹ️
Hooks are an umbrella term for a new kind of special function that “hooks” from your component into the React core machinery.
Functions that start with the word use* are hooks.
⚠️
When you use a hook in a component, you must always use that hook. And you must use the exact same hooks in the exact same order every time you render the component.
So if you use a hook you must always call it, you can’t wrap it in an if or exit out early - the hook must always be called!
There are 15 types of build-in hooks in React 18:
  • Stateful hooks (making components and applications stateful): useState, useReducer, useRef, useContext, useDeferredValue, useTransition
  • Effect hooks (running effects inside components): useEffect, useLayoutEffect
  • Memoization hooks (performance optimization via avoiding re-calculating values): useMemo, useCallback, useId
  • Library hooks (only really needed in larger projects): useDebugValue, useImperativeHandle, useInsertionEffect, useSyncExternalStore

State

ℹ️
State allows us to change values and have the relevant component redraw without reloading the page.
📙
We’re only dealing with state for functional components here. Class-based components work differently - see here
In general, any state used in a web application belongs to one of three categories:
  • Application data (data the user is working on)
  • UI state (which tab is active, whether a panel is collapsed or not, etc.)
  • Form data
 
Very simple API which consists of a single function, useState (a hook!)
  • takes an initial value
  • returns the current state and an update function
const [ currentState, updateFunction ] = useState(initialValue);
Simplest possible example: A counter. When the user clicks a button, we increment the counter and react updates the rendered element.
import { useState } from 'react'; function Counter() { const [ counter, setCounter ] = useState(0); //initial value in (0), returns current state (counter) and update function (setCounter) return ( <main> <p>Clicks: {counter}</p> <button onClick={() => setCounter(value => value + 1)}> Increment </button> </main> ); }
⚠️
Note how counter is a constant value, so calling setCounter doesn’t update it immediately! You can’t call setCounter and immediately continue as the value in counter will not update until after the next render! Instead use an effect that reacts to counter changing!
More complex example where we’re setting a function instead of a value!
import { useState } from 'react'; const OPERATORS = { ADDITION: (a, b) => a + b, SUBTRACTION: (a, b) => a - b, PRODUCT: (a, b) => a * b, }; function Calculator({a, b}) { const [operator, setOperator] = useState(() => OPERATORS.ADDITION); //NOTE how we're returning the function and not just giving it the function! return ( <main> <h1>Calculator</h1> <button onClick={() => setOperator(() => OPERATORS.ADDITION)}> Add </button> <button onClick={() => setOperator(() => OPERATORS.SUBTRACTION)}> Subtract </button> <button onClick={() => setOperator(() => OPERATORS.PRODUCT)}> Multiply </button> <p> Result of applying operator to {a} and {b}: <code> {operator(a, b)} </code> </p> </main> ) } function App() { return <> <Calculator a={7} b={4} /> </>; } export default App;

Previous Value

The setState function conveniently gives you the previous state:
export default const KeyPair = () => { const [ keyPair, setKeyPair ] = useState({ mnemonic: "", seed: "", keypair: { publicKey: "", secretKey: "" }}); const handlePublicKeyChange = (event) => { setKeyPair((prevState) => { return {...prevState, keypair: { publicKey: event.target.value, secretKey: prevState.keypair.secretKey } } }); }; };

State scope

State that spans multiple components. What if we want to access the value in one component, but update it in another?
In the code below, notice how the TodoApplication feeds the update function setHideDone up into the FilterButton. State is stored in TodoApplication and passed around to other components where applicable to render the result we need.
import { useState } from 'react'; function markDone(list, index) { return list.map( (item, i) => i === index ? { ...item, done: true } : item ) } function FilterButton({ current, flag, setFilter, children }) { const style = { border: '1px solid dimgray', background: current === flag ? 'dimgray' : 'transparent', color: current === flag ? 'white' : 'dimgray', padding: '4px 10px', }; return ( <button style={style} onClick={() => setFilter(flag)}> {children} </button> ); } function Task({ task, done, markDone }) { const paragraphStyle = { color: done ? 'gray' : 'black', borderLeft: '2px solid', }; const buttonStyle = { border: 'none', background: 'transparent', display: 'inline', color: 'inherit', }; return ( <p style={paragraphStyle}> <button style={buttonStyle} onClick={done ? null : markDone}> {done ? '✓ ' : '◯ '} </button> {task} </p> ); } function TodoApplication({initialList}) { const [todos, setTodos] = useState(initialList); const [hideDone, setHideDone] = useState(false); const filteredTodos = hideDone ? todos.filter(({done}) => !done) : todos; return ( <main> <div style={{display: 'flex'}}> <FilterButton current={hideDone} flag={false} setFilter={setHideDone} //feeding the update function up into the other component >Show all</FilterButton> <FilterButton current={hideDone} flag={true} setFilter={setHideDone} >Hide done</FilterButton> </div> {filteredTodos.map((todo, index) => ( <Task key={todo.task} task={todo.task} done={todo.done} markDone={() => setTodos(todos => markDone(todos, index))} /> ))} </main> ); } function App() { const items = [ { task: 'Feed the plants', done: false }, { task: 'Water the dishes', done: false }, { task: 'Clean the cat', done: false }, ]; return <TodoApplication initialList={items} />; } export default App;

useRef - remember a value without re-rendering

Like with useState we can persist the state, but useRef doesn’t cause a re-render of the component! Just set the new value via .current
import { useState, useRef } from 'react'; const THRESHOLD = 300; function DoubleClickCounter({ from }) { const [counter, setCounter] = useState(0); const lastClickTime = useRef(null); const onClick = () => { const isDoubleClick = Date.now() - lastClickTime.current < THRESHOLD; if (isDoubleClick) { setCounter(value => value + 1); } else { lastClickTime.current = Date.now(); // <--- } }; return ( <main> <p>Counter: {counter}</p> <button onClick={onClick}>Increment</button> </main> ); }

useRef - to get references to DOM elements

We will also use useRef to get references to DOM elements.
Below we create a variable ref with useRef(), then put it into the input tag and use the useEffect hook (configured to only trigger on mount) to focus that element. Specifically we auto-focus an input field when a component is mounted:
function AutoFocusInput() { const ref = useRef(); useEffect(() => ref.current.focus(), []); return <input ref={ref} />; }
Or another example where we use ref to figure out which of two buttons was pressed. Both buttons call the same onClick function and it uses the ref increment.current to compare against the evt.target:
import { useState, useRef } from 'react'; function Counter({ title, body }) { const [counter, setCounter] = useState(0); const increment = useRef(); const onClick = (evt) => { const delta = evt.target === increment.current ? 1 : -1; setCounter(value => value + delta); }; return ( <section> <h1>Value: {counter}</h1> <button ref={increment} onClick={onClick}>Increment</button> <button onClick={onClick}>Decrement</button> </section> ); }

useContext

similar to useState, but useContext works in a store in a parent component somewhere up the component tree.
ℹ️
Context wraps a number of components with a value that all descendant components can access without going through properties at all.
Occasionally you find yourself passing properties through multiple components just to reach the place where you actually want to display it. (This is called prop drilling) This can become problematic in larger code bases. With Context you don’t have to do that…
You need 2 parts:
  • Provider - contains the value you want to access, set up via createContext(defaultValue) and then fill via <XYZContext.Provider value={value}>
    • const NameContext = createContext(); //out in global-land function Dashboard({ name }) { return ( <NameContext.Provider value={name}> <Header /> <Main /> </NameContext.Provider> ); }
  • Consumer - in each component that wants to use the value
    • const name = useContext(NameContext);
Example:
import { useState, createContext, useContext } from 'react'; // import stuff const BUTTON_STYLE = { display: 'inline-block', padding: '4px 10px', background: 'transparent', border: '0', }; const HEADER_STYLE = { display: 'flex', justifyContent: 'flex-end', borderBottom: '1px solid', }; const NameContext = createContext(); // <--- function Button({ children }) { return <button style={BUTTON_STYLE}>{children}</button>; } function UserButton() { const name = useContext(NameContext); return <Button>👤 {name}</Button>; } function Header() { return ( <header style={HEADER_STYLE}> <Button>Home</Button> <Button>Groups</Button> <Button>Profile</Button> <UserButton /> </header> ); } function Welcome() { const name = useContext(NameContext); // <--- use wherever we need it! return <section><h1>Welcome, {name}!</h1></section>; } function Main() { return <main><Welcome /></main>; } function Dashboard({ name }) { // <--- Below here we fill the Provider return ( <NameContext.Provider value={name}> <Header /> <Main /> </NameContext.Provider> ); } function AdminDashboard() { const [user, setUser] = useState('Alice'); return ( <> <select value={user} onChange={(evt) => setUser(evt.target.value)}> <option>Alice</option> <option>Bob</option> <option>Carol</option> </select> <Dashboard name={user} /> </> ); } export default AdminDashboard;
Note how we use state to set the name and how that basically re-renders the entire site whenever we change it. To prevent that from happening with Memoization. We wrap some things in memo() and we’re good: const Header = memo(Header() { ... } );
⚠️
When you consume a context, you will get the value provided by the nearest provider going up the document. If no provider exists above the consumer, you will get the default value as defined when the context we created.
Ok, so a context can hold different values in different places. Sounds like a bug, but if you’re adventurous you can use it as a feature:
Example with context having different values in different places (borderWidth)
import { useContext, createContext } from 'react'; const BorderContext = createContext(1); function Button({ children }) { const borderWidth = useContext(BorderContext); const style = { border: `${borderWidth}px solid black`, background: 'transparent', }; return <button style={style}>{children}</button> } function CartButton() { return ( <BorderContext.Provider value={5}> <Button>Cart</Button> </BorderContext.Provider> ) } function Header() { const style = { padding: '5px', borderBottom: '1px solid black', marginBottom: '10px', display: 'flex', gap: '5px', justifyContent: 'flex-end', } return ( <header style={style}> <Button>Clothes</Button> <Button>Toys</Button> <CartButton /> </header> ) } function Footer() { const style = { padding: '5px', borderTop: '1px solid black', marginTop: '10px', display: 'flex', justifyContent: 'space-between', } return ( <footer style={style}> <Button>About</Button> <Button>Jobs</Button> <CartButton /> </footer> ) } function App() { return ( <main> <Header /> <h1>Welcome to the shop!</h1> <BorderContext.Provider value={2}> <Footer /> </BorderContext.Provider> </main> ); } export default App;
💡
You can put complex objects and even functions into context!
The problem with this is that everything consuming anything from inside the context will update if something updates in there, even if it’s something that your Component doesn’t even use. (will be addressed in future version of React or can be done via context-selector now)
Example with context as a delivery mechanism for stateful value and setters
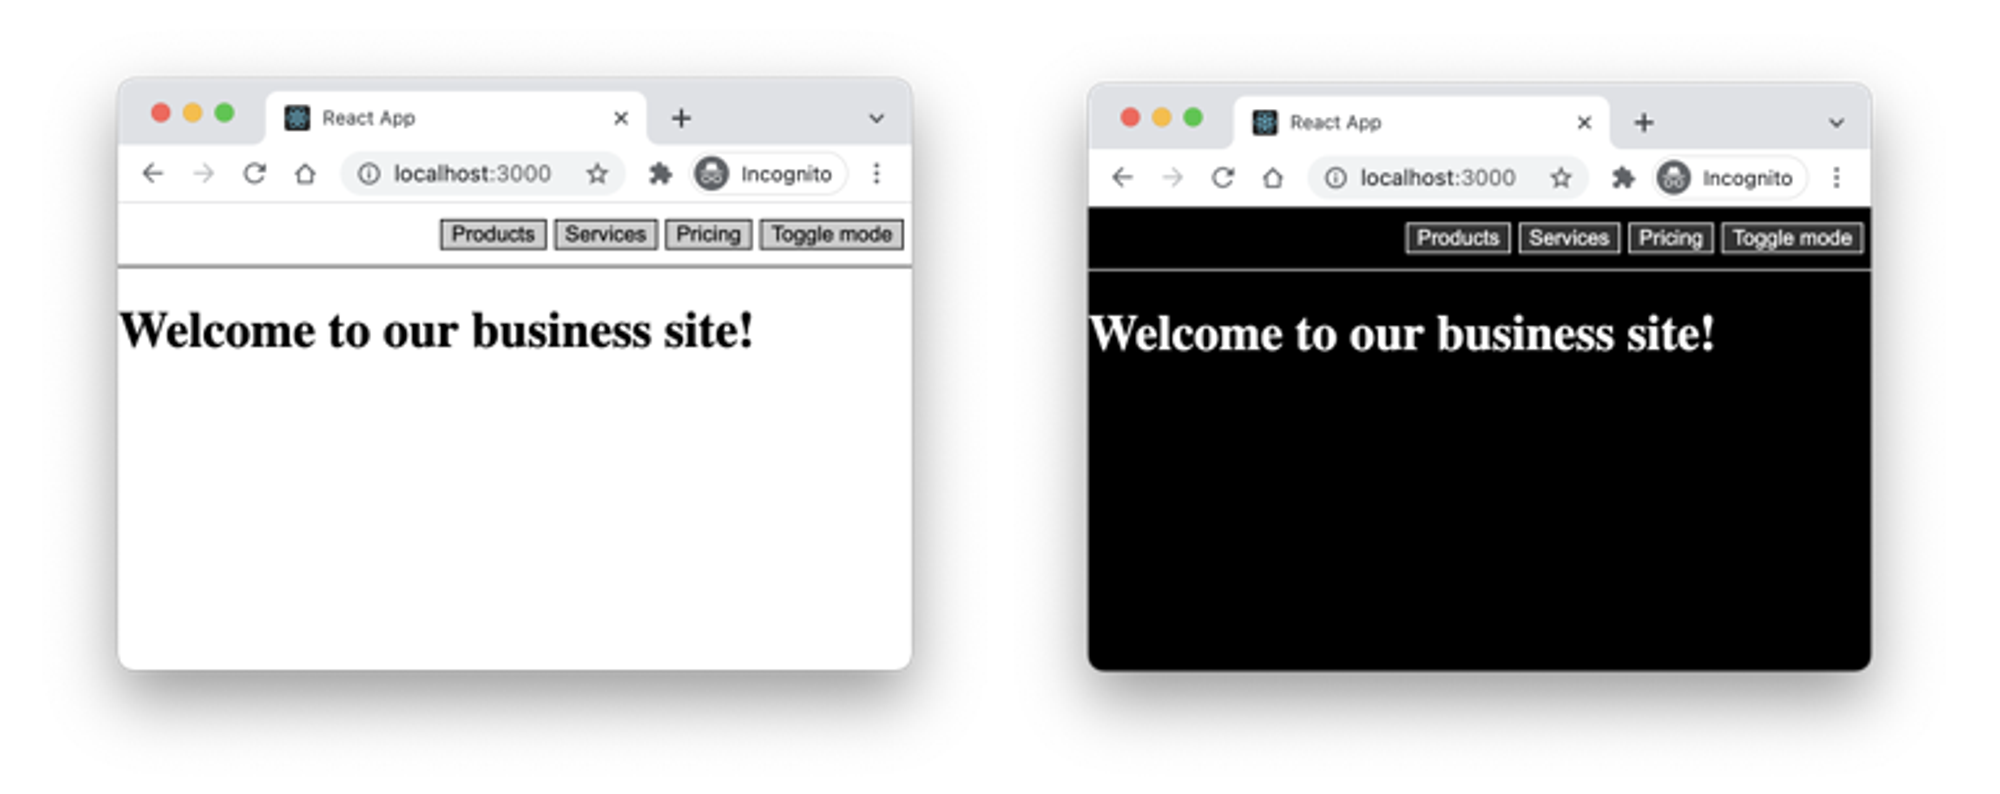
Switch between dark and light mode
notion imagenotion image
import { useContext, useState, createContext, memo } from 'react'; const DarkModeContext = createContext({}); function Button({ children, ...rest }) { const { isDarkMode } = useContext(DarkModeContext); const style = { backgroundColor: isDarkMode ? '#333' : '#CCC', border: '1px solid', color: 'inherit', }; return <button style={style} {...rest}>{children}</button> } function ToggleButton() { const { toggleDarkMode } = useContext(DarkModeContext); return <Button onClick={toggleDarkMode}>Toggle mode</Button> } const Header = memo(function Header() { const style = { padding: '10px 5px', borderBottom: '1px solid', marginBottom: '10px', display: 'flex', gap: '5px', justifyContent: 'flex-end', } return ( <header style={style}> <Button>Products</Button> <Button>Services</Button> <Button>Pricing</Button> <ToggleButton /> </header> ) }); const Main = memo(function Main() { const { isDarkMode } = useContext(DarkModeContext); const style = { color: isDarkMode ? 'white' : 'black', backgroundColor: isDarkMode ? 'black' : 'white', margin: '-8px', minHeight: '100vh', boxSizing: 'border-box', } return <main style={style}> <Header /> <h1>Welcome to our business site!</h1> </main> }); function App() { const [isDarkMode, setDarkMode] = useState(false); const toggleDarkMode = () => setDarkMode(v => !v); const contextValue = { isDarkMode, toggleDarkMode }; return ( <DarkModeContext.Provider value={contextValue}> <Main /> </DarkModeContext.Provider> ); } export default App;

useTransition

New in React 18: Concurrency concept. useTransition can be used to tell React that certain state updates have lower priority. When calling useTransition you get back an array with two elements: an isPending boolean value (tells you if the update is still pending) and a startTransition() function that can be wrapped around a state update to tell React that it is a low priority update.
function App() { const [isPending, startTransition] = useTransition(); const [filterTerm, setFilterTerm] = useState(''); const filteredProducts = filterProducts(filterTerm); function updateFilterHandler(event) { startTransition(() => { setFilterTerm(event.target.value); }); } return ( <div id="app"> <input type="text" onChange={updateFilterHandler} /> {isPending && <p>Updating List...</p>} <ProductList products={filteredProducts} /> </div> ); }
Note how setFilterTerm() is wrapped by startTransition() - without the use of useTransition() the app could get unresponsive.

useDeferredValue

If you can’t use useTransition() because the code that should be wrapped is outside your control, you can use useDeferredValue(). You don’t wrap the state-updating code, instead you wrap the value that’s in the end generated or changed because of the state update.
function ProductList({ products }) { const deferredProducts = useDeferredValue(products); return ( <ul> {deferredProducts.map((product) => ( <li>{product}</li> ))} </ul> ); }
React will perform other state or UI updates with a higher priority than updates related to the products value.

useReducer

ℹ️
The term reducer is used to refer to the function or a set of functions that converts the current state into a new state based on a given action. In React we expect reducers to be pure, deterministic and side-effect free as well.
💡
You invoke dispatch with an action object, that is then passed to the reducer along with the old state, and the reducer is expected to return the new state.
const [state, dispatch] = useReducer(reducer, initialState);
Flow of data is similar to a useState hook
  • starts with an initial value
  • then updates as the application progresses
BUT the way that you update the internal state is more complex, in that you "reduce" the new state from the old one using functions and actions.
notion imagenotion image
dispatch works as our enhanced setter function, which allows us to not set the value directly, but rather instruct the reducer function on how to set the value.
import { useReducer } from 'react'; function reducer(state, { type }) { switch (type) { case "INCREMENT": return state + 1; case "DECREMENT": return state - 1; default: return state; } } function Counter() { const [counter, dispatch] = useReducer(reducer, 0); return ( <section> <h1>Counter: {counter}</h1> <div> <button onClick={() => dispatch({ type: "INCREMENT" })}> Increment </button> <button onClick={() => dispatch({ type: "DECREMENT" })}> Decrement </button> </div> </section> ); }
👉🏼
Alternative to useReducer: The external library use-reduction provides a much cleaner interface, namely useReduction

Effects

ℹ️
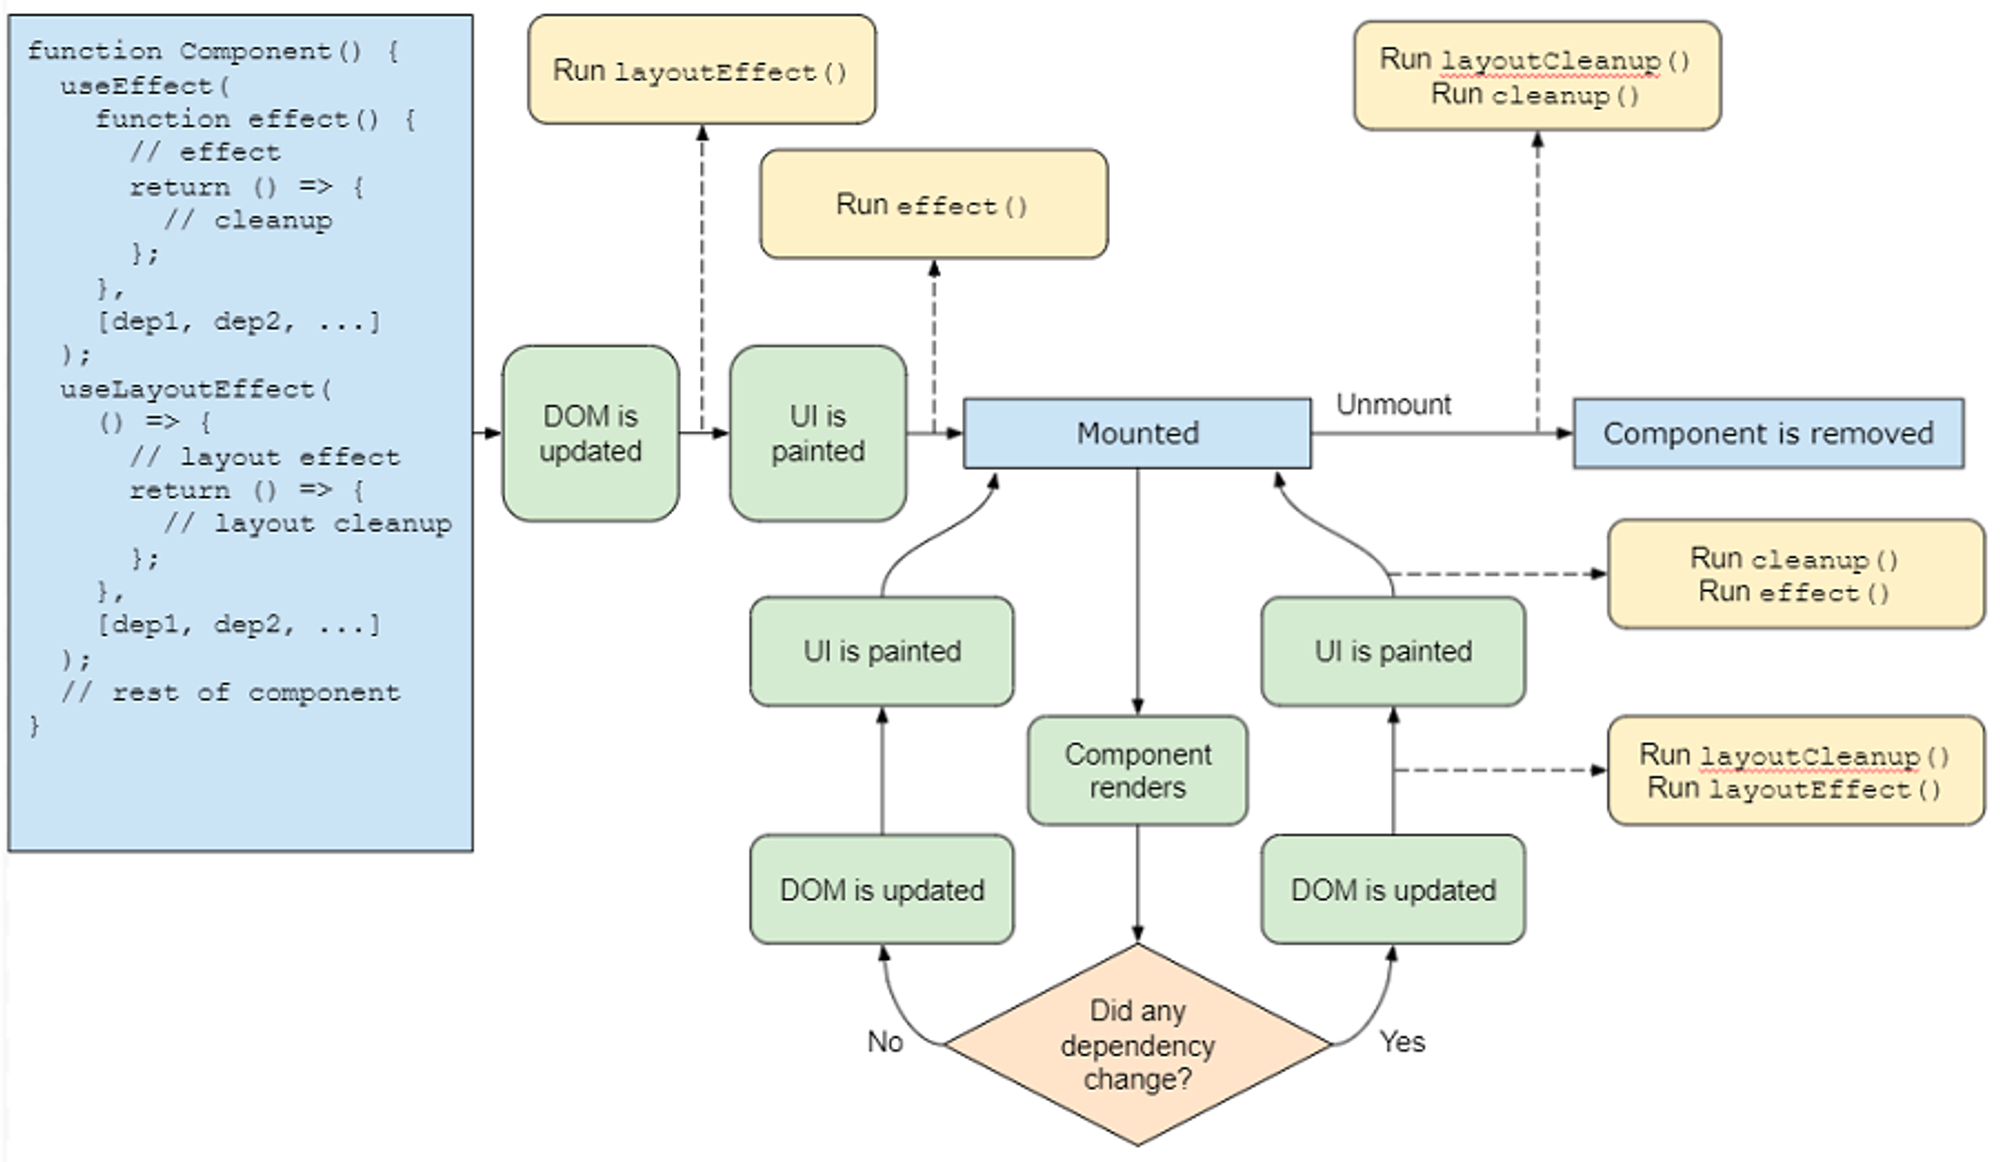
Effects are functions that run inside a component under certain circumstances. This can be done with an effect hook called useEffect
An effect in a useEffect hook is triggered when either value in a set of dependencies changes.
An effect can define a cleanup function that runs either before the effect is triggered again or if the component unmounts.
useEffect(() => { // do effects stuff console.log(`changed!`); // return a function that cleans up after this effect return function cleanup() { console.log(`cleanup`); }; );
As you see above, every effect may return a function that cleans up after it. This lets us keep the logic for adding and removing subscriptions close to each other. They’re part of the same effect!
But it doesn’t have to do cleanup. Here’s an example without:
import { useState, useEffect } from 'react'; function RemoteDropdown() { const [options, setOptions] = useState([]); useEffect( () => fetch('//www.swapi.tech/api/people') .then(res => res.json()) .then(data => setOptions(data.results.map(({ name }) => name))), [], ); return ( <select> {options.map(option => ( <option key={option}>{option}</option> ))} </select> ); } function App() { return <RemoteDropdown />; } export default App;
We can also do just the cleanup
useEffect( () => () => trackEvent('dialog_dismissed'), [], );
We can pass in a second argument to useEffect that allows us to restrict when the effect runs. If we give it a variable it will only run the effect if that variable updates!
useEffect(() => { document.title = `You clicked ${count} times`; }, [count]); // Only re-run the effect if count changes

LayoutEffect

If we use useLayoutEffect instead of useEffect we can run an effect after React generates the HTML, but before the browser updates the UI and displays it. (Only needed in special cases)
notion imagenotion image

Dependency Arrays

Used by useEffect, useCallback, useMemo and useLayoutEffect.
3 ways - very different outcomes! Note how a missing dependency array does pretty much the opposite of an empty dependency array!
  • don’t specify an array at all - hook should be triggered on every render
  • specify an empty array - hook will only trigger on mount and never again
  • specify a non-empty array - hook will trigger if any of the given values in the array change on a render

Events

Events are the way users interact with a JavaScript web application.
To handle an event, assign any function to the value of the event on an object that might dispatch such an event. The event handler function will be called with a single argument: an event object (you can ignore it if you don’t care)
import { useState } from 'react'; function Counter() { const [counter, setCounter] = useState(0); const onClick = () => setCounter(c => c + 1); return ( <> <h1>Value: {counter}</h1> <button onClick={onClick}>Increment</button> </> ); }
Another example:
import { useState } from 'react'; function MouseStatus() { const [isMoving, setMoving] = useState(false); const onMouseMove = () => setMoving(true); useEffect(() => { if (!isMoving) return; const timeout = setTimeout(() => setMoving(false), 500); return () => clearTimeout(timeout); }, [isMoving]); return ( <section onMouseMove={onMouseMove}> <h2> The mouse is {!isMoving && 'not'} moving: {isMoving ? '✓' : '✗'} </h2> </section> ); }
You can only use React to listen for events that are actually supported by React.

Supported Events

Clipboard events - onCopy, onCut, onPaste
Composition events - onCompositionEnd, onCompositionStart, onCompositionUpdate
Keyboard events - onKeyDown, onKeyPress, onKeyUp
Focus events - onFocus, onBlur
Form events - onChange, onInput, onInvalid, onReset, onSubmit
Generic events - onError, onLoad
Mouse events - onClick, onContextMenu, onDoubleClick, onDrag, onDragEnd, onDragEnter, onDragExit, onDragLeave, onDragOver, onDragStart, onDrop, onMouseDown, onMouseEnter, onMouseLeave, onMouseMove, onMouseOut, onMouseOver, onMouseUp
Pointer events - onPointerDown, onPointerMove, onPointerUp, onPointerCancel, onGotPointerCapture, onLostPointerCapture, onPointerEnter, onPointerLeave, onPointerOver, onPointerOut
Selection events - onSelect
Touch events - onTouchCancel, onTouchEnd, onTouchMove, onTouchStart
UI events - onScroll
Wheel events - onWheel
Media events - onAbort, onCanPlay, onCanPlayThrough, onDurationChange, onEmptied, onEncrypted, onEnded, onError, onLoadedData, onLoadedMetadata, onLoadStart, onPause, onPlay, onPlaying, onProgress, onRateChange, onSeeked, onStalled, onSuspend, onTimeUpdate, onVolumeChange, onWaiting
Image events - onLoad, onError
Animation events - onAnimationStart, onAnimationEnd, onAnimationIteration
Transition events - onTransitionEnd
Other events - onToggle
 

Custom Hooks

ℹ️
The definition of a custom hook, is a function that uses a hook. Simple as that.
For example:
function useToggle(default = false) { const [value, setter] = useState(Boolean(default)); const toggle = useCallback(() => setter(v => !v), []); return [value, toggle]; }
Than use like this:
function App() { const [isDarkMode, toggleDarkMode] = useToggle(); ... }
Another example that handles form input
function useForm(initialValues) { const [data, setData] = useState(initialValues); const onChange = useCallback((evt) => { const key = evt.target.name; const value = evt.target.value; setData(oldData => ({ ...oldData, [key]: value })); }, []); return [data, onChange]; }
then use like this:
function Address() { const [data, onChange] = useForm({ address1: '', address2: '', zip: '', city: '', state: '', country: '', }); ... }
Get more hooks here:

Forms

ℹ️
Controlled inputs - React manages what’s in each input via value and onChange Uncontrolled inputs - React doesn’t care about anything and you only look at the input once the user submits. Then you access the inputs via evt.target.elements.* in the onSubmit event.
This is how you handle controlled inputs:
import { useState } from 'react'; function Sum() { const [first, setFirst] = useState(0); const [second, setSecond] = useState(0); const onChangeFirst = (evt) => setFirst(evt.target.valueAsNumber); const onChangeSecond = (evt) => setSecond(evt.target.valueAsNumber); return ( <form style={{display: 'flex', flexDirection: 'column'}}> <label> A: <input type="number" value={first} onChange={onChangeFirst} /> </label> <label> B: <input type="number" value={second} onChange={onChangeSecond} /> </label> <div>A+B: {first + second}</div> </form> ); }
We specify both the value and the onChange properties for our inputs. This is required to make a controlled input.
If you set the value directly in React, you must also listen for the change event and update the value and this makes your input controlled.
You can use this to filter input:
import { useState } from 'react'; const PLACEHOLDER = `conic-gradient( gray 0.25turn, white 0 0.5turn, gray 0 0.75turn, white 0 1turn, )`; function HexColor() { const [color, setColor] = useState('BADA55'); const onChange = (evt) => setColor( evt.target.value .replace(/[^0-9a-f]/gi, '') .toUpperCase() ); const outputStyle = { width: '19px', border: '1px solid', background: color.length === 6 ? `#${color}` : PLACEHOLDER, }; return ( <form style={{display:'flex'}}> <label> Hex color: <input value={color} onChange={onChange} /> </label> <span style={outputStyle} /> </form> ); }
or to apply a mask:
import { useState } from 'react'; function TicketNumber() { const [ticketNumber, setTicketNumber] = useState(''); const onChange = (evt) => { const [first = '', second = ''] = evt.target.value .replace(/[^0-9a-z]/gi, '').slice(0,6).match(/.{0,3}/g); const value = first.length === 3 ? `${first}-${second}` : first; setTicketNumber(value.toUpperCase()); }; const isValid = ticketNumber.length === 7; return ( <form style={{display:'flex'}}> <label> Ticket number: <input value={ticketNumber} onChange={onChange} placeholder="E.g. R1S-T2U" /> </label> <span> {isValid ? '✓' : '✗'} </span> </form> ); }
Uncontrolled Inputs:
import { useState } from 'react'; function NaturalSum() { const [sum, setSum] = useState(0); const onSubmit = (evt) => { const value = evt.target.elements.operand.valueAsNumber; const naturalSum = value * (value + 1) / 2; setSum(naturalSum); evt.preventDefault(); }; return ( <form onSubmit={onSubmit} style={{display: 'flex', flexDirection: 'column'}} > <label> Number: <input type="number" defaultValue="1" min="1" name="operand" /> </label> <div><button>Submit</button></div> <div>Sum: {sum}</div> </form> ); }
Example: Controlled via Uncontrolled Submit via POST
With controlled inputs:
import { useState } from 'react'; const URL = '//salespower.invalid/api/address'; function Address() { const [data, setData] = useState({ address1: '', address2: '', zip: '', city: '', state: '', country: '', }); const onChange = (evt) => { const key = evt.target.name; const value = evt.target.value; setData(oldData => ({ ...oldData, [key]: value })); }; const onSubmit = (evt) => { fetch(URL, { method: 'POST' body: JSON.stringify(data), }); evt.preventDefault(); } return ( <form onSubmit={onSubmit} style={{display:'flex',flexDirection:'column'}}> <label> Address line 1: <input value={data.address1} name="address1" onChange={onChange} /> </label> <label> Address line 2: <input value={data.address2} name="address2" onChange={onChange} /> </label> <label> Zip: <input value={data.zip} name="zip" onChange={onChange} /> </label> <label> City: <input value={data.city} name="city" onChange={onChange} /> </label> <label> State: <input value={data.state} name="state" onChange={onChange} /> </label> <label> Country: <input value={data.country} name="country" onChange={onChange} /> </label> <button>Submit</button> </form> ); }
Same thing with uncontrolled inputs: (actually simpler in this case!)
import { useState } from 'react'; const URL = '//salespower.invalid/api/address'; function Address() { const onSubmit = (evt) => { const data = {}; Array.from(evt.target.elements).slice(0,6).forEach(input => { data[input.name] = input.value; ]); fetch(URL, { method: 'POST' body: JSON.stringify(data), }); evt.preventDefault(); } return ( <form onSubmit={onSubmit} style={{display:'flex',flexDirection:'column'}}> <label> Address line 1: <input name="address1" /> </label> <label> Address line 2: <input name="address2" /> </label> <label> Zip: <input name="zip" /> </label> <label> City: <input name="city" /> </label> <label> State: <input name="state" /> </label> <label> Country: <input name="country" /> </label> <button>Submit</button> </form> ); }

File Inputs

File Inputs can only be uncontrolled.
 
Next.js example (Move?)
import Head from 'next/head'; import { useState } from 'react'; import styles from '../styles/Home.module.css'; function MyForm() { const [userInput, setUserInput] = useState({ enteredName: '', enteredEmail: '', }); const nameChangeHandler = (event) => { setUserInput((prevState) => { return { ...prevState, enteredName: event.target.value }; }); }; const emailChangeHandler = (event) => { setUserInput((prevState) => { return { ...prevState, enteredEmail: event.target.value }; }); }; const submitHandler = (event) => { event.preventDefault(); // don't reload page console.log(userInput); } return ( <form onSubmit={submitHandler}> <div> <label>Name </label> <input type='text' onChange={nameChangeHandler} /> </div> <div> <label>Email </label> <input type='email' onChange={emailChangeHandler} /> </div> <div> <button type='submit'>Add</button> </div> </form> ); } export default function Test() { return ( <div className={styles.container}> <Head> <title>Test</title> <meta name="description" content="Generated by create next app" /> <link rel="icon" href="/favicon.ico" /> </Head> <main className={styles.main}> <h1 className={styles.title}> Test </h1> <div className={styles.grid}> <div className={styles.card}> <h2>Form</h2> <MyForm /> </div> </div> </main> </div> ); }

Optimising performance - useMemo

Minimize re-rendering! JavaScript tries to run at about 60 fps (16ms per frame) Each time React renders one or more components it counts as one frame. If the entire React render takes more than 16ms, your browser will start to treat your script as “slow” and start dropping frames. If you have lots of animations, your users will notice…
Response time matters - if a user interface doesn’t update within 0.1 seconds, it does not seem instantaneous to the user. We’re already losing 16ms because due to the new state of component rendering only on the next frame, let’s not waste the rest of the time we have…
Memoization is the concept of remembering the last input and output of a pure function. If the function is invoked again with those same inputs, we just return the same value again rather than call the function again. - This only makes sense for pure functions whose return value depends solely on their inputs! Similar to caching, but usually only remembers the last value.
import { memo } from 'react'; const rawAddition = (a, b) => a + b; const addition = memo(add);
This is a shitty example that doesn’t work. Figure this out later…
You can memoize bits of React applications in three ways:
  • memoize an entire component
  • memoize a bit of JSX
  • memoize a property to be passed to a component
Memoize a component:
import { memo, useState } from 'react'; const Items = memo(function Items({ items }) { return ( <> <h2>Todo items</h2> <ul> {items.map(todo => <li key={todo}>{todo}</li>)} </ul> </> ); }); function Todo() { const [items, setItems] = useState(['Clean gutter', 'Do dishes']); const [newItem, setNewItem] = useState(''); const onSubmit = (evt) => { setItems(items => items.concat([newItem])); setNewItem(''); evt.preventDefault(); }; const onChange = (evt) => setNewItem(evt.target.value); return ( <main> <Items items={items} /> <form onSubmit={onSubmit}> <input value={newItem} onChange={onChange} /> <button>Add</button> </form> </main> ); }
use useMemo to mamoize any value between renders
useCallback is basically the same as `const useCallback = (fn, deps) => useMemo(() => fn, deps);
notion imagenotion image

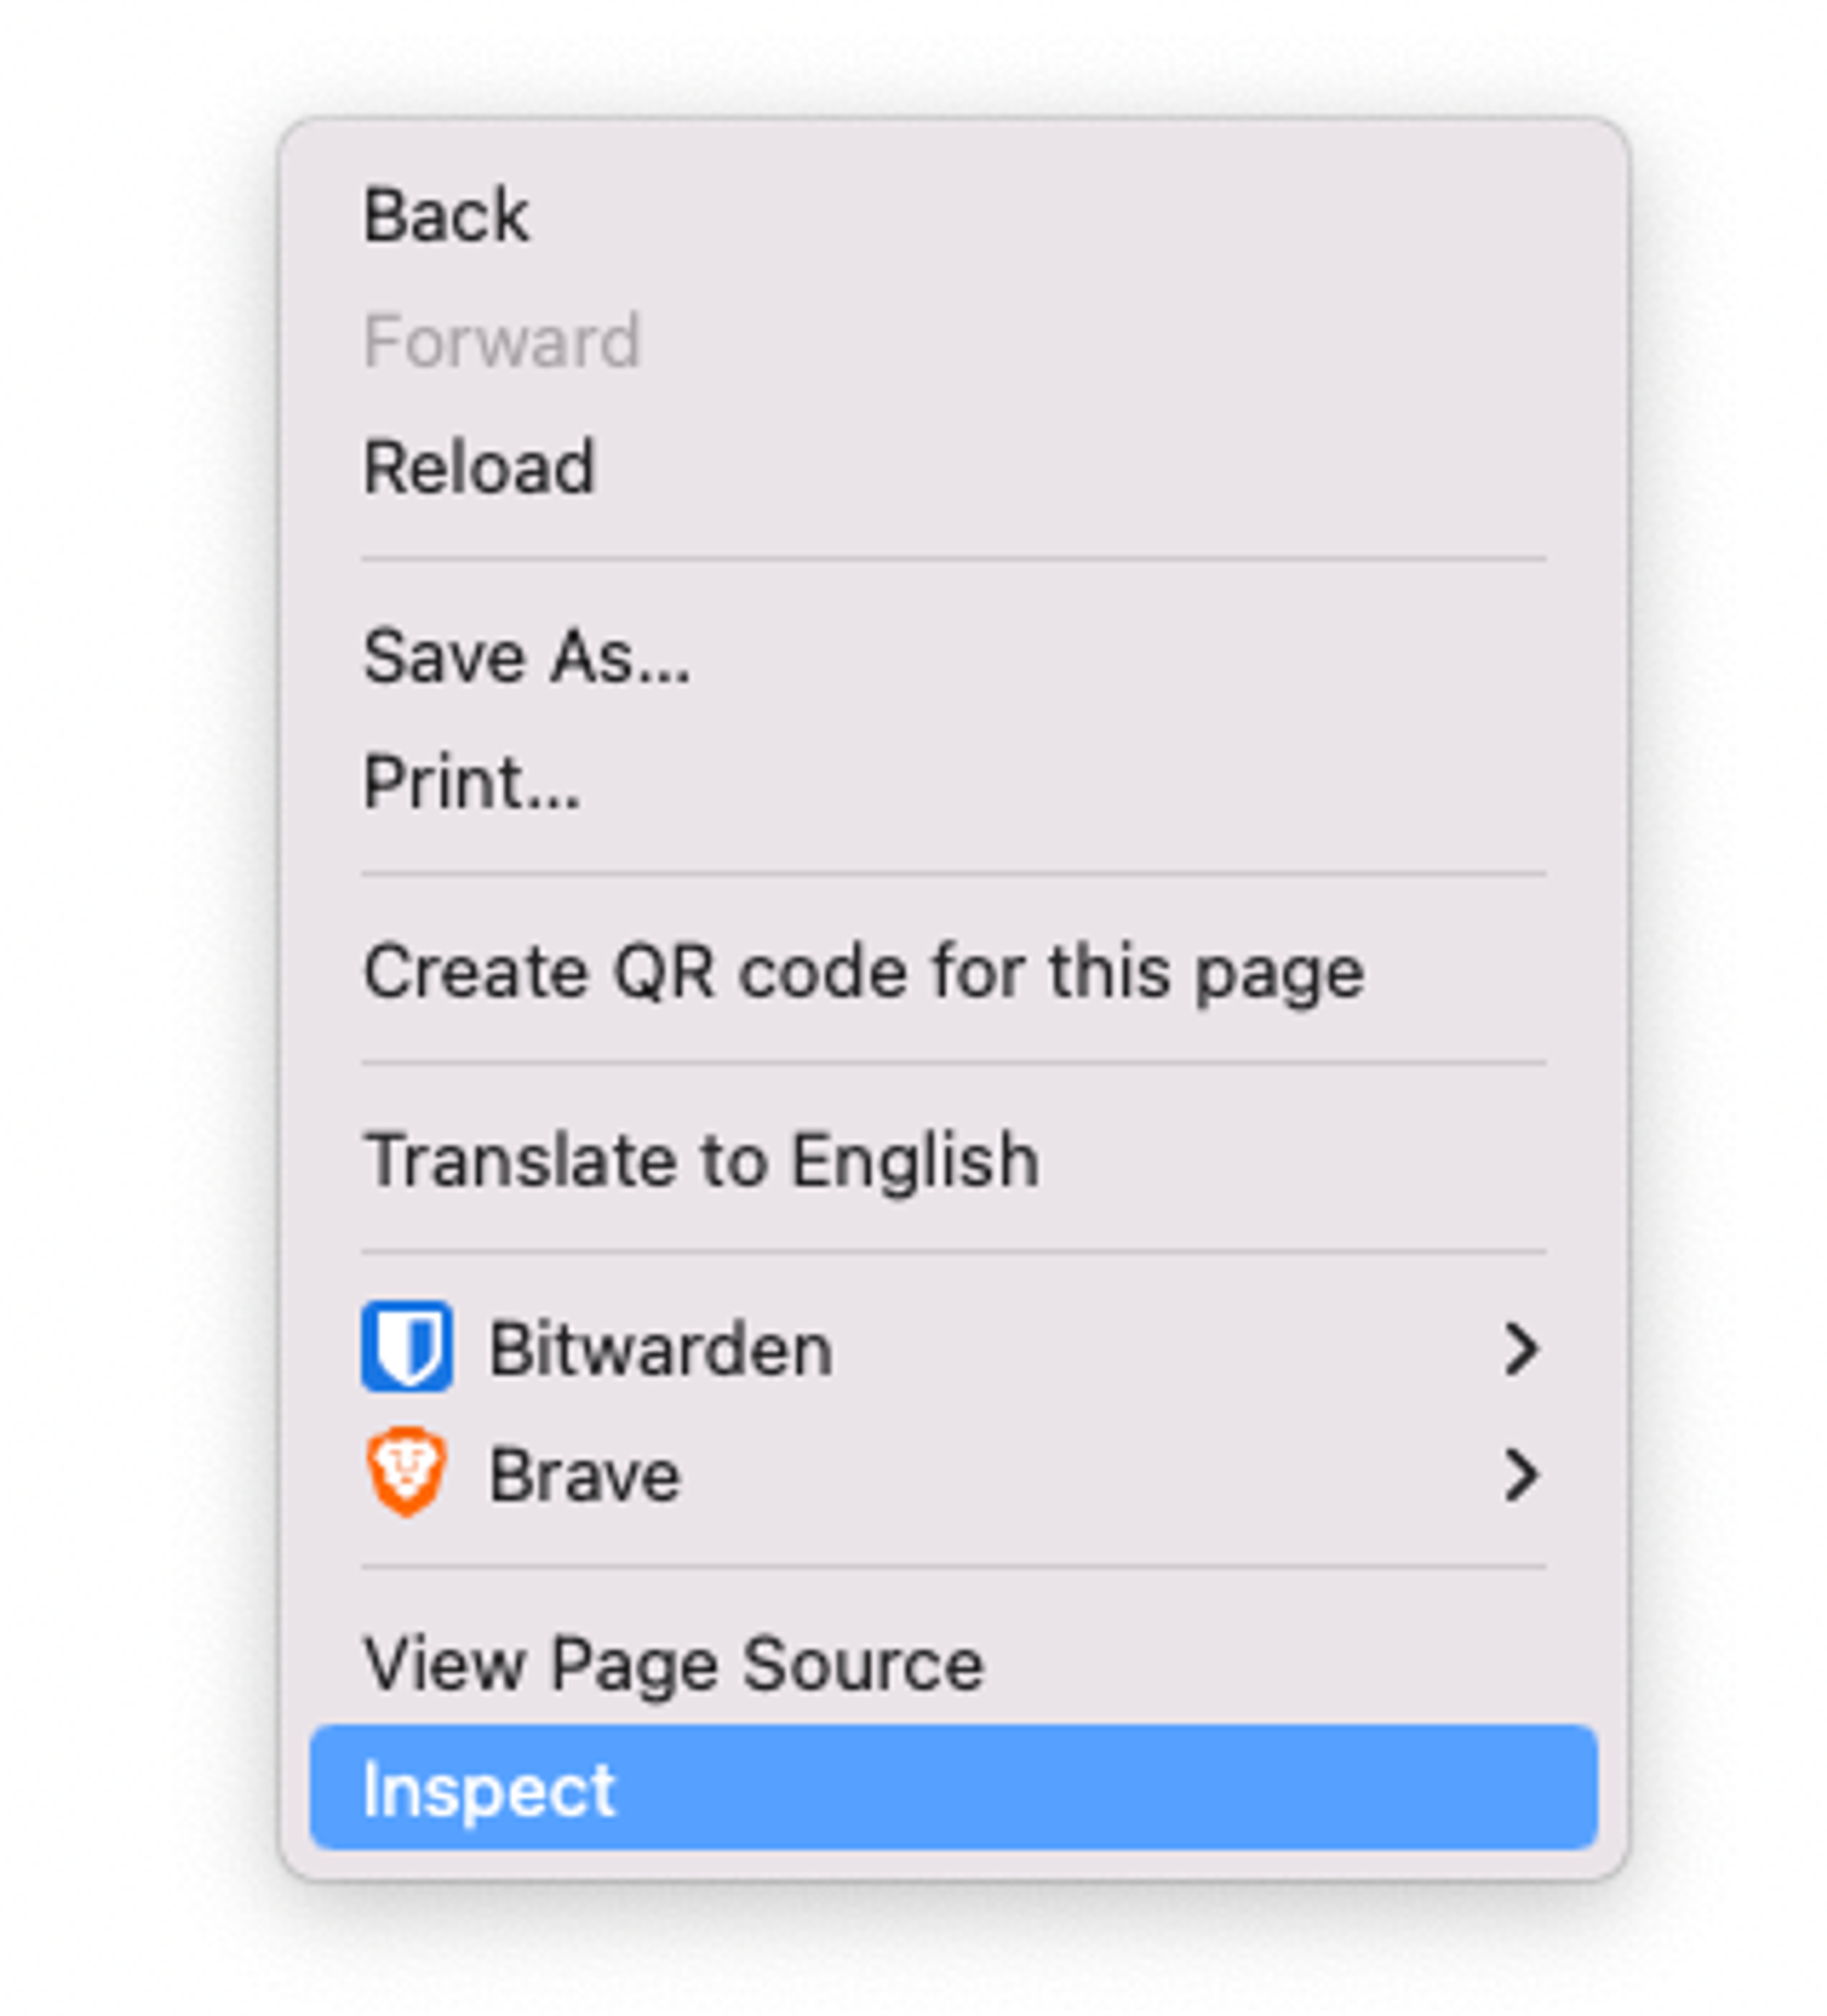
React Developer Tools Browser Plugin

Adds a few things to the Inspect panel. (Which you should already be using for the console, etc.)
notion imagenotion image
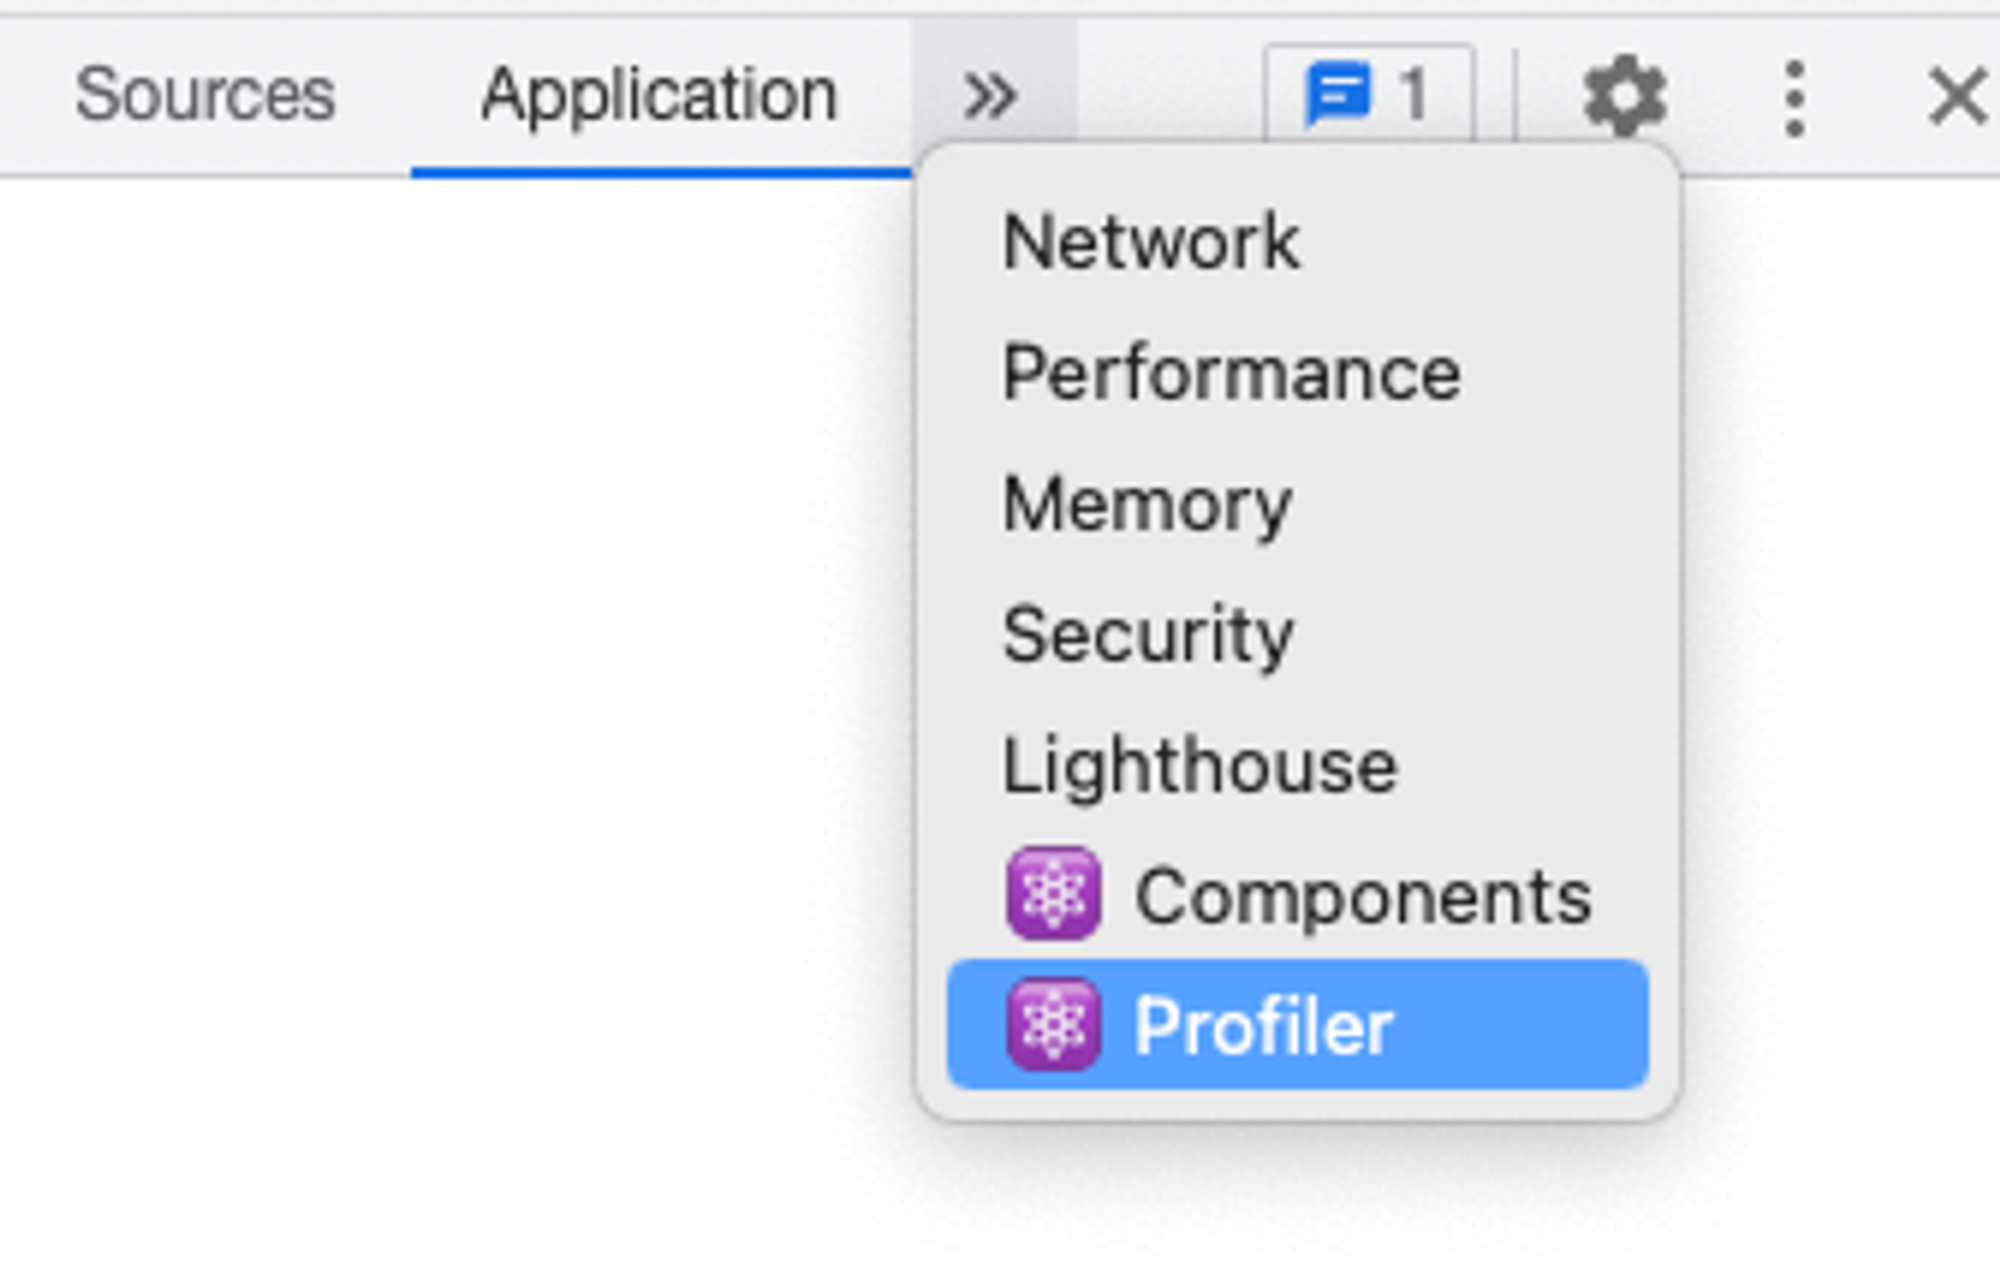
Components lets you inspect react components!
Profiler shows you how long everything takes, etc.
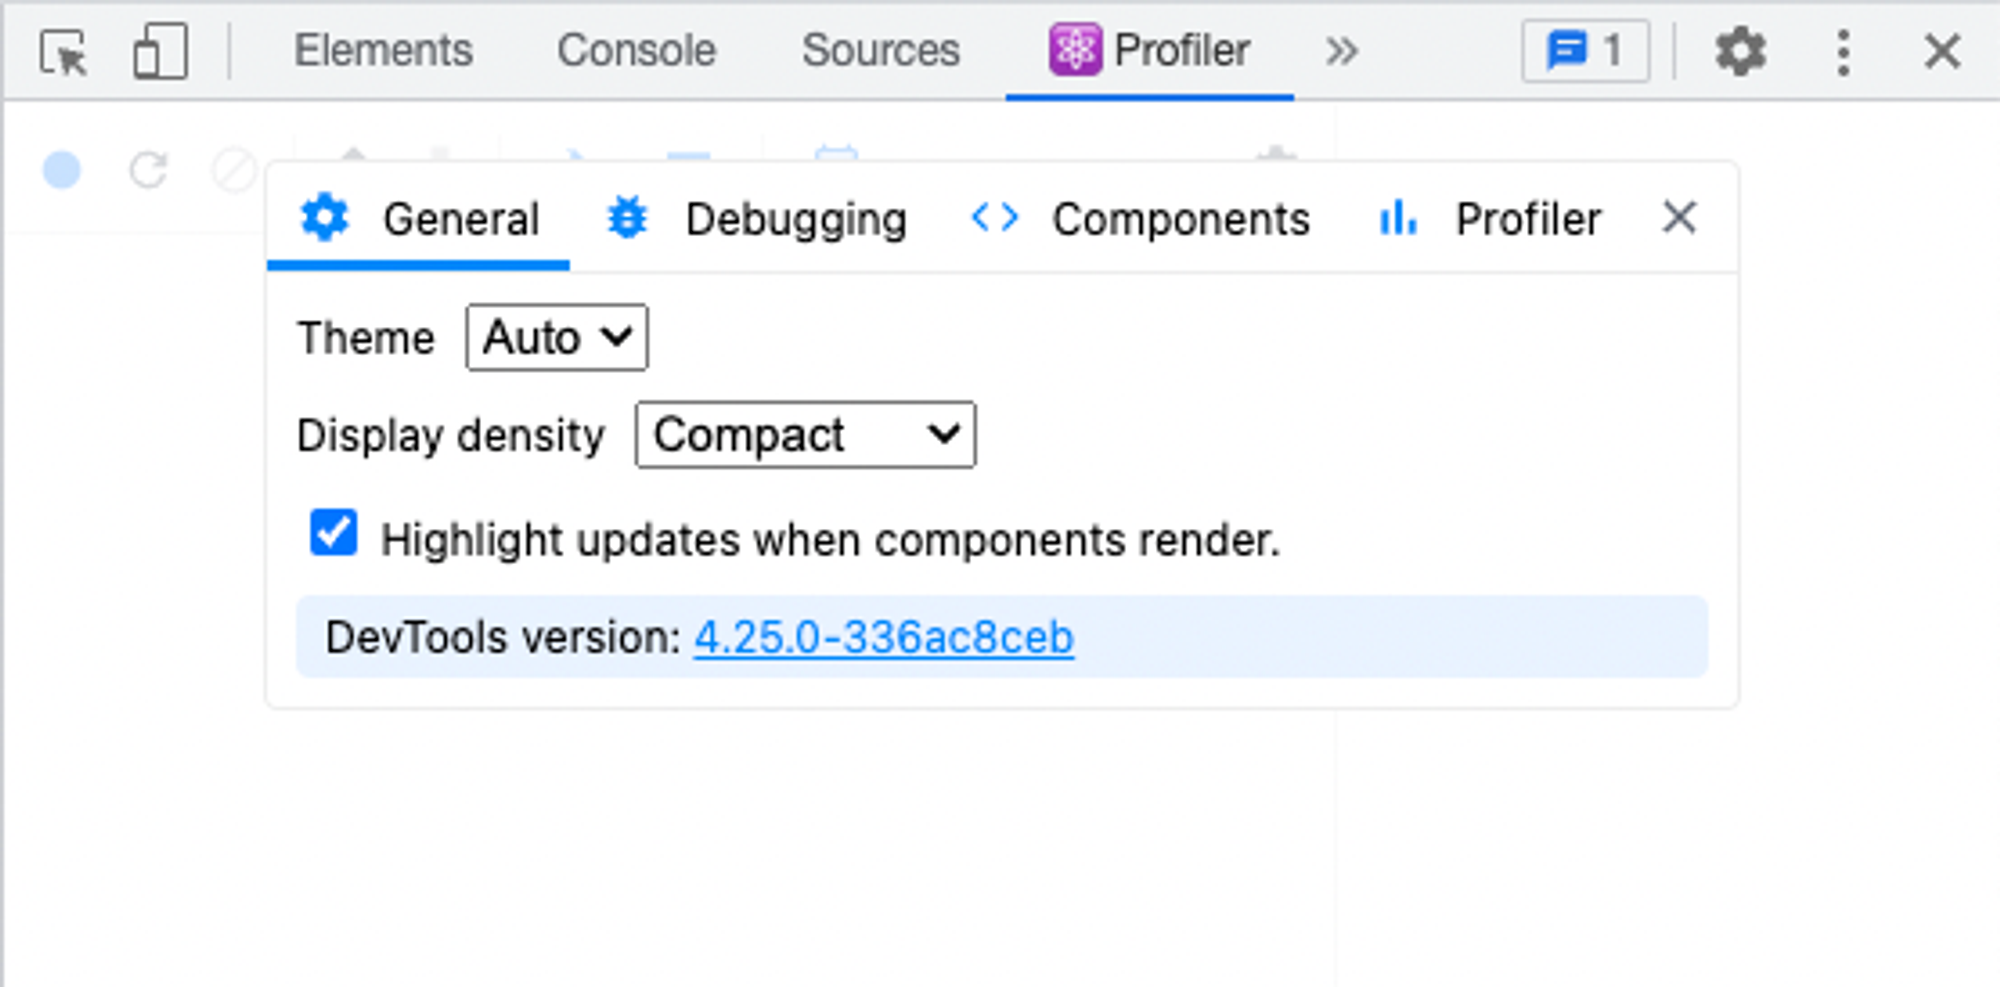
And this setting is also convenient: highlights each component that re-renders:
 
notion imagenotion image

Common Errors

Changing uncontrolled input to be controlled

Warning: A component is changing an uncontrolled input to be controlled. This is likely caused by the value changing from undefined to a defined value, which should not happen. Decide between using a controlled or uncontrolled input element for the lifetime of the component. More info: https://reactjs.org/link/controlled-components
Happens in this case:
const [imageUri, setImageUri] = useState(undefined); const onImageUriChange = (e) => { setImageUri(e.target.value); updateMetadata({imgUri: e.target.value}); }; <Form.Control onChange={onImageUriChange} value={imageUri} />
Not obvious, but starting the state out as undefined is the issue. Do this instead:
const [imageUri, setImageUri] = useState('');

Other stuff

props.children gives you all the child-elements
Custom elements won’t take on className automatically (<Card className=’blah’> does nothing), you’ll have to apply it yourself (props.className) in the component
 
function Card(props) {} is the same as const Card = (props) => {}


Leave a comment