Automate the boring parts
This is a write-up of my talk at NZGDC 2023 → ▶️ Slides
Intro
No matter how exciting the project you’re working on - it will inevitably contain dull, repetitive tasks. Assigning items to lists, sifting through endless amounts of assets, finding specific bits and pieces in the hierarchy - And what’s worse is that some of those boring tasks require your full attention and are even pretty exhausting to do! So you wear yourself out by doing something that could just as well be done by a monkey.
Well, I think we want to use our brain power on the important stuff instead. On the things that make a difference for our game! So whenever we find ourselves in the face of a boring task - let’s take a minute and see if we can write a small reusable tool to automate it!
Guiding Principles
I’ve been thinking about what’s been the most useful to me over the years and I’ve narrowed it down to these guiding principles: Convenience, Speed, Clarity - each one is good, if you manage do all 3 at once you’re golden.
Convenience
Nothing important should be more than a click or a shortcut away!
-
This can be as simple as a window with shotcut buttons to your most often needed folders and objects.
-
Or a menu item item that does something convenient for you
It doesn’t have to be pretty, some of these things are just for you.
- Or a window with buttons for aligning selected objects. Align them, space them out.
- Or this window - I got the idea from a handy little feature in Modo. If you’re tweaking values, then you don’t want to go sift through the hierarchy and jump from one thing to the next again and again. With Channel Focus you can add individual channels from different objects and tweak them easily, as well as monitor their values. But most importantly you can tweak at utmost efficiency! No time wasted, all your focus on the task at hand!
Speed
Save time (and your mental health) by automating things you have to do again and again.
Over the years I’ve taken several attempts to find a more general solution to the problem of having to do boring, repetitive stuff - the best one so far is BatchProcessor* *- Often times you have to find 20 little things in a scene or want to clean up and rename a few things and it’s always tedious. So I tried to build a general purpose tool to help with all that.
BatchProcessor lets you search for items, then apply “processors” to the resulting list of objects. So for example you could search for all UI elements in a specific colour and change it. Or search for all objects called Column with a boxCollider that’s less than a meter high and rename and number them to Small Column 1,2,3, etc.
Clarity
Make it easy to see what’s going on, what’s missing, etc. (Custom Inspectors, custom setup tools, etc.)
- For my long-time side-project Synthspace I built a custom Editor Window that makes setting up new modules easy. It guides me through the process, shows me what’s still missing and wherever possible offers a way to solve it or at least shows a shortcut to where my attention is needed!
But let’s get to it, let me show you how to build some useful bits and pieces!
What can we do in Unity?
What can we make, what can we customize?
As it turns out - pretty much everything.
We can create custom Editor Windows, Wizards, Custom Inspectors, add menu items, context menu options, create custom Scene Tools, draw lines and place gizmos in the scene view, we can add Settings, hook into asset importing and the build process, we can create custom previews, manipulate selections, etc., etc.
Everything that’s non-visual is just an Editor script and all you need to do is figure out what Editor API to hook into.
Everything that’s visual can be done with either IMGUI or UI Toolkit
The interface of the Unity Editor itself is done with IMGUI and UI Toolkit, so it’s quite easy to expand.
Basics
So what’s an Editor Script? In Unity there’s a fundamental difference between “normal” scripts and “Editor” scripts.
To make a script an Editor script you simply put it in a folder called “Editor” (you can have multiple of those all over your project)
Editor scripts
-
won’t be included in builds
-
can use stuff in the
UnityEditornamespace!
A word of warning: nothing prevents you from using Editor-only APIs in normal scripts, but your builds will fail.
Menu Items
Simplest example: Let’s make a menu item that zeroes out the rotation of all selected objects!
We need a static class with a static function that we attribute with MenuItem
using UnityEditor;
using UnityEngine;

public static class Zero {
   [MenuItem( "Tools/Zero Rotation %&z" )]
   public static void ZeroRotation() {
      foreach( var g in Selection.gameObjects ) {
         Undo.RecordObject( g.transform, "Zero Rotation" );
         g.transform.rotation = Quaternion.identity;
      }
   }
}
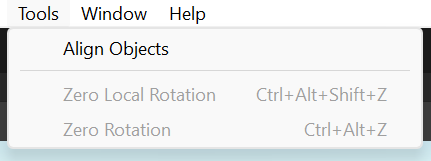
Now we have a menu item under Tools and we even added a keyboard shortcut!
% is for CTRL / CMD
# is for SHIFT
& is for ALT
Inside we step through all the GameObjects inside the current Selection, record an Undo step and change the rotation to zero. - note how this is one way of handling Undo - you record an object, then change it. We’ll see a different way later on.
Further Reading:
Validate Function
There’s more things we can do with the MenuItem attribute. While we can’t change the name of a menu item at runtime, we can add a validation function that determines if our menu item should be enabled or disabled. In our case, it only makes sense to use our menu item if there are items selected, so let’s check if our selection is empty or not.
	 [MenuItem( "Tools/Zero Rotation %&z", true )]
   public static bool ZeroRotationValidation() {
      return Selection.gameObjects.Length > 0;
   }
As you see, I created a function that returns true when we have selected at least one item. By giving it the same attribute with true for the isValidateFunction argument, we turn this function into a validate function for our menu item
Lastly we can determine where in the menu our function will be shown. If we add a number as the last argument - that will be used to figure out the order of things. If there’s a difference bigger than 10, it will add a divider in between menu items.
Here’s the finished script:
using UnityEditor;
using UnityEngine;

public static class Zero {

   [MenuItem( "Tools/Zero Rotation %&z", false, 901 )]
   public static void ZeroRotation() {
      foreach( var g in Selection.gameObjects ) {
         Undo.RecordObject( g.transform, "Zero Rotation" );
         g.transform.rotation = Quaternion.identity;
      }
   }

   [MenuItem( "Tools/Zero Rotation %&z", true )]
   public static bool ZeroRotationValidation() {
      return Selection.gameObjects.Length > 0;
   }

   [MenuItem( "Tools/Zero Local Rotation %&#z", false, 900 )]
   public static void ZeroLocalRotation() {
      foreach( var g in Selection.gameObjects ) {
         Undo.RecordObject( g.transform, "Zero Local Rotation" );
         g.transform.localRotation = Quaternion.identity;
      }
   }

   [MenuItem( "Tools/Zero Local Rotation %&#z", true )]
   public static bool ZeroLocalRotationValidation() {
      return Selection.gameObjects.Length > 0;
   }

}
There’s more places where we can add menu items: If you want to add something to the context menu of a component, just do this:
[MenuItem ("CONTEXT/Rigidbody/Double Mass")]
static void DoubleMass (MenuCommand command) {
  Rigidbody body = (Rigidbody)command.context;
  Undo.RecordObject( body, "Double Rigidbody Mass" );
  body.mass = body.mass * 2;
  Debug.Log ("Doubled Rigidbody's Mass to " + body.mass + " from Context Menu.");
}
Attributes and PropertyDrawers
So what was this MenuItem command in square braces really? Well, it was an Attribute! Attributes** **are classes that inherit from the Attribute base class. They can be used as sort of tags on other pieces of code. The cool thing is there’s a bunch of useful ones for customizing the looks of inspectors and we can make our own too!
So even before we talk about IMGUI and UI Toolkit in a minute, we can already start customizing our inspectors!
Let’s say we have a very simple Spaceship class
using UnityEngine;

public class Spaceship : MonoBehaviour {
	public float HullStrength = 100f;
  public float BoostStrength = 5f;
	public float TurnSpeedDegPerSec = 180f;
	public Rigidbody Rigidbody;
	public ParticleSystem BoosterParticles;
	public float CurrentDamage;
}
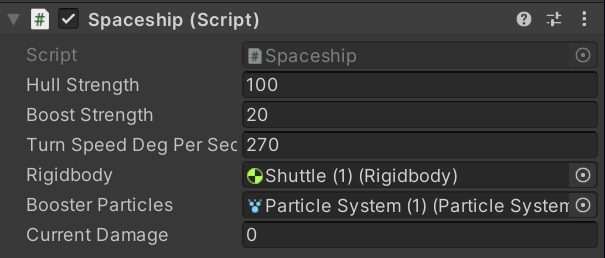
Bit boring, you can’t really tell what’s what. Is anything wrong with this setup, is something missing or out of range? Is everything exactly as it should be? Who knows?
Let’s spice it up a bit with some attributes:
using UnityEngine;

[RequireComponent(typeof(Rigidbody))]
public class Spaceship : MonoBehaviour {

	[Header( "Requirements" )]
	public Rigidbody Rigidbody;
	public ParticleSystem BoosterParticles;

	[Space( 4f )]
	[Header( "Config" )]
	[ContextMenuItem("Player Default", "SetPlayerDefault", order = 1)] //calls named function
	[ContextMenuItem("Enemy Default", "SetEnemyDefault", order = 2)]
	public float HullStrength = 100f;
	[Range(1f, 50f), Tooltip("Strength of the Engine")] public float BoostStrength = 5f;
	[Range(45f, 360f)] public float TurnSpeedDegPerSec = 180f;

	[Space( 4f )]
	[Header( "Runtime" )]
	public float CurrentDamage;

	private void OnValidate() { // called when a value changes in the inspector
		if( m_Rigidbody == null ) m_Rigidbody = GetComponent<Rigidbody>();
	}

	[ContextMenu("Reset Damage")]
	private void ResetDamage() {
		CurrentDamage = 0f;
	}

	private void SetPlayerDefault() {
		HullStrength = 100f;
	}

	private void SetEnemyDefault() {
		HullStrength = 50f;
	}
}
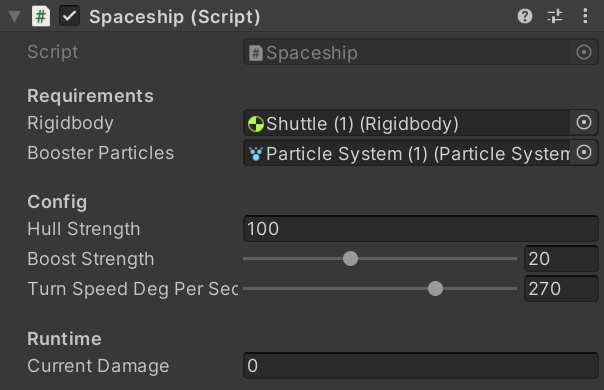
It’s better than before and adding some attributes only took a minute!
Custom Attributes and PropertyDrawers
Did I mention you can make custom ones too? Here’s one I’ve made that I find immensely useful: it’s called Highlight.
Custom Attribute
This is the HighlightAttribute class, deriving from PropertyAttribute
using UnityEngine;

public class HighlightAttribute : PropertyAttribute {
    public Color color;
    public bool highlightOnlyIfNull;

    public HighlightAttribute() {
        this.color = Color.red;
        this.highlightOnlyIfNull = false;
    }
    public HighlightAttribute( bool highlightOnlyIfNull ) {
        this.color = new Color( 0.5f, 0f, 0f );
        this.highlightOnlyIfNull = highlightOnlyIfNull;
    }
    public HighlightAttribute( float r, float g, float b, bool highlightOnlyIfNull = false ) {
        this.color = new Color( r, g, b );
        this.highlightOnlyIfNull = highlightOnlyIfNull;
    }
    public HighlightAttribute( float r, float g, float b, float a, bool highlightOnlyIfNull = false ) {
        this.color = new Color( r, g, b, a );
        this.highlightOnlyIfNull = highlightOnlyIfNull;
    }
    public HighlightAttribute( string hexColor, bool highlightOnlyIfNull = false ) {
        this.color = HexToColor( hexColor );
        this.highlightOnlyIfNull = highlightOnlyIfNull;
    }

    private Color HexToColor( string hexColor ) {
        hexColor = hexColor.Trim( char.Parse( "#" ) );

        float r = (float)byte.Parse( hexColor.Substring( 0, 2 ), System.Globalization.NumberStyles.HexNumber );
        float g = (float)byte.Parse( hexColor.Substring( 2, 2 ), System.Globalization.NumberStyles.HexNumber );
        float b = (float)byte.Parse( hexColor.Substring( 4, 2 ), System.Globalization.NumberStyles.HexNumber );
        float a = hexColor.Length == 8 ? (float)byte.Parse( hexColor.Substring( 6, 2 ), System.Globalization.NumberStyles.HexNumber ) : 1f;
        return new Color( r, g, b, a );
    }

}
It does nothing except offer a few constructors to fill its two variables color and highlightOnlyIfNull
Custom PropertyDrawer
The second piece of the Puzzle is a PropertyDrawer - When I first heard about this class I struggled to understand what it was for. No it’s not a drawer you put properties into, no, it *draws *a property.
This one needs to be in an Editor folder!
using UnityEngine;
using UnityEditor;

[CustomPropertyDrawer( typeof( HighlightAttribute ) )]
public class HighlightPropertyDrawer : PropertyDrawer {

    public override float GetPropertyHeight( SerializedProperty property, GUIContent label ) {
        return EditorGUI.GetPropertyHeight( property, label, true );
    }

    public override void OnGUI( Rect position, SerializedProperty property, GUIContent label ) {
        HighlightAttribute highlightAttribute = attribute as HighlightAttribute;
        bool doColor = true;
        if( highlightAttribute.highlightOnlyIfNull ) { //if colorOnlyIfNull, then we need to figure out if the property is null/0!
            doColor = IsPropertyNull( property );
        }
				Color rememberColor = GUI.contentColor;
        if( doColor ) EditorGUI.DrawRect( position, highlightAttribute.color );
        EditorGUI.PropertyField( position, property, label, true );
				GUI.contentColor = rememberColor;
    }

    private bool IsPropertyNull( SerializedProperty property ) {
				if( property.type.StartsWith( "PPtr<" ) ) {
            return property.objectReferenceValue == null;
        } else {
            if( property.type == "string" ) return string.IsNullOrEmpty( property.stringValue );
            else if( property.type == "int" ) return property.intValue == 0;
            else if( property.type == "float" ) return property.floatValue == 0f;
            else if( property.type == "bool" ) return property.boolValue;
            else if( property.type == "double" ) return property.doubleValue == 0d;
				else if( property.type == "AnimationCurve" ) return property.animationCurveValue.keys.Length == 0;
            else Debug.LogWarning( "ColorAttribute doesn't work with the type " + property.type );
        }
        return false;
    }

}
Note how it’s got an attribute telling Unity that this is a custom property drawer for the Highlight attribute and how it derives from the PropertyDrawer class.
Most of the code is actually spent trying to figure out if the property is null or zero or empty or whatever.
Now watch what happens if we add this to the BoosterParticles field in our Spaceship class with the colorOnlyIfNull option:
[Highlight(true)] // colorOnlyIfNull true = highlight only if null or empty
public ParticleSystem BoosterParticles;
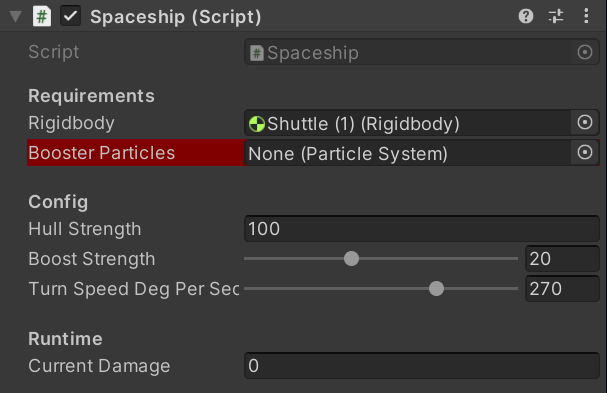
It goes red when the field is empty - Now I can tell if something important is missing!
Custom UIs - IMGUI vs UI Toolkit
There are 2 UI systems we can use:
Immediate Mode GUI (IMGUI)
IMGUI has been around since Unity 2.0. It’s a nice and simple way to build nice and simple interfaces. If you try to build something more complex, it’s possible, but be prepared for tears.
It’s called Immediate Mode because you code layout and functionality all in the same script.
IMGUI only works in special places though (OnGUI for runtime, OnInspectorGUI for inspectors, OnGUI for EditorWindows) because it needs to look at the same code from multiple angles:
-
First it runs a layout pass that figures out the sizing and positioning of all elements
-
then it handles all events that have happened during the previous frame
-
and finally it does a repaint pass where it actually draws everything onto the screen.
It’s simple to use. If you want a button, you write :
The Button function returns a bool, so if you want your button-click to do something, just wrap it in an if:
if( GUILayout.Button("Click me")) {
	Debug.Log("Clicked!");
}
Note how the GUILayout contains all the things you can use at runtime, but EditorGUILayout contains a whole lot more for use only in the Editor! 🌐 → Unity Docs on EditorGUILayout
You can do basic layouting by wrapping things in GUILayout.BeginVertical and GUILayout.EndVertical, etc.
GUILayout.BeginVertical(  );

GUILayout.BeginHorizontal(  );
if( GUILayout.Button( "Button A" ) ) Debug.Log( "A" );
if( GUILayout.Button( "Button B" ) ) Debug.Log( "B" );
GUILayout.EndHorizontal();

GUILayout.BeginHorizontal(  );
m_Color = EditorGUILayout.ColorField( m_Color );
m_Val = EditorGUILayout.ToggleLeft( "Check me", m_Val );
GUILayout.EndHorizontal();

GUILayout.EndVertical();

UI Toolkit
UI Toolkit is the new kid on the GUI block and based around web development paradigms. It’s a retained mode toolkit and based on UXML markup and USS style sheets. It’s great for more complex projects, but it’s more unwieldy right out of the box. Where IMGUI usually allows you to have everything in one compact script, with UI Toolkit you’re usually looking at least at a longer script and a UXML file. On the positive side, Unity has been working on tooling for a few years now and the most useful thing that’s come out of that is the UI Builder - a graphical drag and drop way of creating a UXML UI.
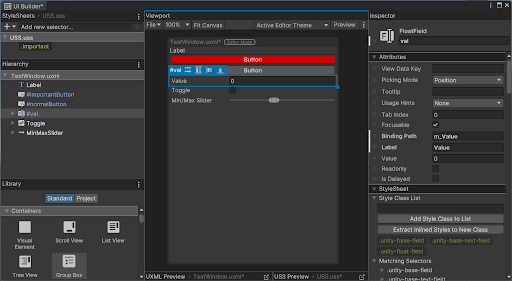
Then you just have to awkwardly bind it to your functionality and you’re good to go!
public void CreateGUI() {
    var root = new VisualElement();
    m_Uxml.CloneTree( root ); // Clone UXML into VisualElement
    rootVisualElement.Add( root ); // Add VisualElement with UXML to rootVisualElement

		// Set up Button Callbacks
    rootVisualElement.Q<Button>( "importantButton" ).clicked += () => {
			Debug.Log( "Clicked important button!" );
		};
    rootVisualElement.Q<Button>( "normalButton" ).clicked += () => {
      m_Value = Random.Range( 0.0f, 100.0f );
      Debug.Log( $"Clicked normal button. {m_Value}" );
	  };

		// Bind FloatField and register ValueChanged-Callback
    rootVisualElement.Bind( new SerializedObject( this ) );
    FloatField valField = rootVisualElement.Q<FloatField>( "val" );
    valField.RegisterValueChangedCallback( (v) => Debug.Log( $"Changed: {v.newValue}" ));
}
It’s all a bit awkward in my opinion, but then again all web development is a bit awkward, so…
Custom Inspectors
Let’s make some custom inspectors for a simple class!
I want to track the health of an Entity - player, monsters, NPC, whatever - so I made a simple class for that.
Leave a comment